Category Archives: tech

Articles relating to a variety of technical themes. Dividing by Zero is not defined, so this fits in as well as anything else does.

Setting defaults for the dig command

Today I learned you can set default output options for the dig command by creating a .digrc file in your home directory.

Ordinally, running the command dig www.chaosandpenguins.com, the result is this rather hefty block of text.

$ dig www.chaosandpenguins.com

; <<>> DiG 9.16.1-Ubuntu <<>> www.chaosandpenguins.com
;; global options: +cmd
;; Got answer:
;; ->>HEADER<<- opcode: QUERY, status: NOERROR, id: 40732
;; flags: qr rd ad; QUERY: 1, ANSWER: 2, AUTHORITY: 0, ADDITIONAL: 0
;; WARNING: recursion requested but not available

;; QUESTION SECTION:
;www.chaosandpenguins.com.      IN      A

;; ANSWER SECTION:
www.chaosandpenguins.com. 0     IN      CNAME   chaosandpenguins.com.
chaosandpenguins.com.   0       IN      A       216.92.152.175

;; Query time: 0 msec
;; SERVER: 172.28.224.1#53(172.28.224.1)
;; WHEN: Wed Nov 16 23:13:00 EST 2022
;; MSG SIZE  rcvd: 136

That’s a whole lot of text. So let’s add a couple options. +noall turns off everything. Running dig www.chaosandpenguins.com +noall would literally return nothing at all. To bring back the answer section (which is what I’m interested in most of the time), you add the +answer option.

$ dig www.chaosandpenguins.com +noall +answer
www.chaosandpenguins.com. 0     IN      CNAME   chaosandpenguins.com.
chaosandpenguins.com.   0       IN      A       216.92.152.175

That’s much more compact , but getting it requires some extra typing. And I want that version of the output most of the time, so wouldn’t it be nice if there was to make that the default?

This is where the .digrc file comes in. You create it in your home directory and just put in a single line containing the options you want. So, to make +noall +answer the defaults, I just run this command:

$ echo +noall +answer > ~/.digrc

And now when I run dig www.chaosandpenguins.com without any options, here’s the default output:

$ dig www.chaosandpenguins.com
www.chaosandpenguins.com. 0 IN CNAME chaosandpenguins.com.
chaosandpenguins.com. 0 IN A 216.92.152.175

Making a “dumb” lamp smart with Home Assistant

I have a parrot – her name’s Terry Datyl. I also have a bunch of house plants. These two statements are connected, though perhaps not in an obvious manner.

Part of my morning routine is to go downstairs and uncover Terry’s cage, turn on the light next to the cage, and then turn on the radio so she has a “flock” of sorts to hang out with. Next, I turn on the various grow lights for the house plants.

That was the routine for several years. I’d connect lamp timers when I was gone for the weekend and it all worked fairly well.

A while back, I thought it might be interesting to have Home Assistant take over turning on the plant lights. Ideally, a trigger would fire when Terry’s lamp was turned on and I could just put some smart plugs on the plant lights.

Have you ever tried shopping for a smart lamp? They do exist, but it mostly seems like accent lighting. I haven’t found anything which was meant to illuminate a room and nothing that really fit into our décor anyhow.

So, what I hit on was the idea of connecting the existing lamp (the “control lamp” if you will) to a TP-Link HS110 smart plug. In addition to the vanilla on/off capability, this particular plug also reports power usage. (Note: This may no longer be possible with TP-Link smart plug. A 2020 firmware update removed an API Home Assistant relies on. The general concepts however should still apply to other smart plugs with power monitoring capabilities.)

So, step one was to connect the plant lights to smart plugs. I used TP-Link plugs because I already had them, but you can use others. (As noted above, that may indeed be necessary.)

Next, I created two “scenes” in Home Assistant. One in which all the plant lights were on, and another where they were all off. (Creatively named, “Plants Off” and “Plants On.”)

Next up was setting up the HS110 plug that would be running the show. In addition to an on/off state, the HS110 exposes several state “attributes”: voltage, current, and the current (meaning “right now”) power in watts. This last one is what we’re interested in.

State attributes vary from one device to the next, so Home Assistant doesn’t really have a good way to expose them directly. Instead, you can expose the values you want via sensor templates.

Go into the Home Assistant config directory and edit the sensor.yaml file (creating it if necessary). Here’s the entry I created to read how many watts Terry’s lamp is using

- platform: template
  sensors:
    terry_s_lamp_watts:
      friendly_name_template: "{{ states.switch.terry_s_lamp.name}} Current Consumption"
      value_template: '{{ states.switch.terry_s_lamp.attributes["current_power_w"] | float }}'
      unit_of_measurement: 'W'

Note: the friendly_name_template and value_template entries are one line apiece (one day I’ll tweak this theme to better accommodate code snippets). This is just a plain YAML file so all the usual editing concerns apply.

This shows up in Home Assistant as a numeric sensor with the name sensor.terry_s_lamp_watts (you may need to restart for it to show up). It’s a floating-point number, so we’ll have to accommodate for that in the automation.

You’ll need to know how much power the lamp draws in its on and off states so in the Home Assistant UI, go to Developer Tools > States and select the entity sensor.terry_s_lamp_watts (substituting your sensor’s name, of course) and if all is right, the current power draw will show up in the “State” field. Turn the lamp on and off (using the the lamp’s switch, not the smart switch) and note the values (click the “refresh” icon to get the new value).

The final step then is to create two automations. Mine are named “Terry’s lamp turns on” and “Terry’s lamp turns off.”

For the “on” automation, I used a numeric state trigger on the entity sensor.terry_s_lamp_watts. The power usage tends to vary over time as the bulb warms and cools, so I chose 9 watts as a value that comfortably below the lamp’s “on” state while still higher than the lamp’s “off” state. (Similarly, the “off” automation uses a value of 5 watts, which allowed me to turn on the radio that was plugged into the same smart plug without triggering the automations.)

For both automations, the only action is to activate the appropriate scene. Either scene.plants_on or scene.plants_off.

At this point, you now have a single lamp which uses its existing switch to control other lights. (This means, no worries about guests messing things up by not using the smart switch – this adds smarts to the “dumb” lamp.)

Latency

With the HS110 smart plug on the control lamp, there’s a delay of up to 30 seconds between the time the control lamp changes state and when the automation will run. That’s because TP-Link smart plugs don’t actively report their state and Home Assistant has to use “local polling” to check whether the switch’s state has changed since the last time it was set. In order avoid flooding the local network with traffic, Home Assistant only checks the device’s status once every 30 seconds. Devices from other manufacturers may behave differently.

To solve this using the HS110 device, I added an additional automation, using a trigger type of “Time Pattern” with Hour and Minutes left blank and Seconds set to /3, the automation runs every 3 seconds. I then set the action manually, in the UI’s YAML editor

service: homeassistant.update_entity
data: {}
entity_id:
  - switch.terry_s_lamp
  - switch.office_light

This action causes Home Assistant to update the state for both the switch.terry_s_lamp (the control lamp) and switch.office_light (the smart switch in my home office, also a TP-Link device).

Creating A Hue Account

Another entry in the “So I can look this up later” series.

I’ve been trying to hook up some Phillips Hue bulbs to the Google Assistant. To do that, you need to link your Hue and Google accounts. That’s not a problem, except I didn’t have a Hue account….

The online help and several searches said to create it through the Hue app. I think there was an option to do that when I first installed the app, but I didn’t want to create yet another online account just then and skipped it. And now that I wanted to create one, I couldn’t find an option to do so. (This is where someone will inevitably chime in with, “Just click on this item, and then click such-and-such….” and I don’t know what to say to that except that I spent a good long time digging though the app, clicking every option I could find.)

Long story short, I finally discovered you can go to https://account.meethue.com and create an account there. Once you’ve done that, and assuming you’re on the same network as the Hue bridge, you click a button on the web site, push the button on the bridge, and through some magic I don’t quite understand, the browser will detect your bridge and link it to your account.

Converting a WordPress Site to static HTML

I have a few old sites I created in WordPress but no longer update aside from installing newer versions of WordPress. I don’t want to run out of date software, but I also don’t want to take down the content.

It’s been a decade since Fanboy’s Convention List was last updated, but there are blog posts with well established URLs. (Besides, I still have dreams of one day reviving the site.)

My solution is to first, create backups of everything, and then spider the site, capture all the generated HTML and put the static pages back to replace them.

I’ve known about GNU Wget for just about forever, but only as an alternative to curl. What I discovered is that Wget has a —mirror option which allows you to download the entire site. It has a lot of options you’ll want to look into (so do look at the docs) but what I finally settled on for my purposes was

wget --mirror --page-requisites --wait=2 https://www.fanboyslist.com

Note: The --wait=2 makes Wget wait two seconds between requests. If you’re using this to mirror someone else’s site, consider using a higher value in order to avoid overloading their server. Badly behaved spiders can wreak havoc on sites with dynamically generated pages and may be blocked as a result.

Fun fact: although you may associate Wget with Linux, it’s also available for Windows. There are some differences in what characters are used for outputting file names, it should otherwise work the same way.

On the first pass, instead of directories mirroring the site structure, there were a bunch of files with names like index.html?p=257 (on Windows, this would show up as index.html%3Dp=257). Turns out that at some point, the site’s permalinks were turned off and WordPress had reverted to query string parameters.

Fix the permalinks, make sure categories and tags will have names instead of parameters.

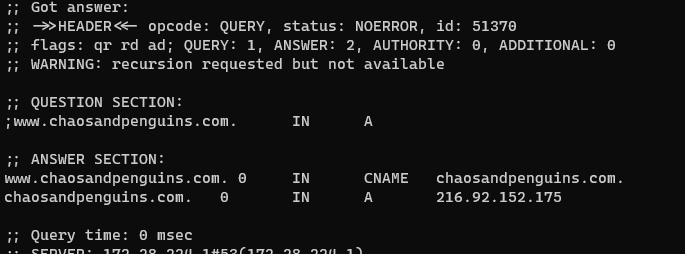
The next pass has the directory structure, but still had the files with query strings. Digging in a bit, WordPress is generating “shortlinks” in the form

https://www.fanboyslist.com/blog/?p=257

Shortlinks are a microformat, meant to provide a shorter link for when you’re manually typing the URL. But this site doesn’t provide a means for manually discovering them, and I’m trying to remove the mechanism for resolving them, so that’s not needed in the static page (for my purposes, the canonical URL is much more useful).

One Google search later, I found a comment on a support thread about disabling shortlinks. In a nutshell, add this line to the end of the theme’s functions.php file:

remove_action('wp_head', 'wp_shortlink_wp_head', 10, 0);

(Note: I’m trying to remove this entire WordPress installation, so I’m going to modify the theme’s file. On an installation you were planning to keep, this should go in a child theme.)

While we’re fiddling with functions.php, remove the headers for the REST API, from https://wordpress.stackexchange.com/a/211469

remove_action( 'wp_head', 'rest_output_link_wp_head'              );
remove_action( 'wp_head', 'wp_oembed_add_discovery_links'         );
remove_action( 'template_redirect', 'rest_output_link_header', 11 );

Next, let’s get rid of the bit where the site is loading support for emoji (this site predates most US use of emoji). Here’s a nice little snippet from: https://www.netmagik.com/how-to-disable-emojis-in-wordpress/

/**
 * Disable the emoji's
 */
function disable_emojis() {
	remove_action( 'wp_head', 'print_emoji_detection_script', 7 );
	remove_action( 'admin_print_scripts', 'print_emoji_detection_script' );
	remove_action( 'wp_print_styles', 'print_emoji_styles' );
	remove_action( 'admin_print_styles', 'print_emoji_styles' );	
	remove_filter( 'the_content_feed', 'wp_staticize_emoji' );
	remove_filter( 'comment_text_rss', 'wp_staticize_emoji' );	
	remove_filter( 'wp_mail', 'wp_staticize_emoji_for_email' );
	
	// Remove from TinyMCE
	add_filter( 'tiny_mce_plugins', 'disable_emojis_tinymce' );
}
add_action( 'init', 'disable_emojis' );

/**
 * Filter out the tinymce emoji plugin.
 */
function disable_emojis_tinymce( $plugins ) {
	if ( is_array( $plugins ) ) {
		return array_diff( $plugins, array( 'wpemoji' ) );
	} else {
		return array();
	}
}

Remove the individual RSS feeds for each post’s comments

add_filter( 'feed_links_show_comments_feed', '__return_false' );

And then, a pile of other things to remove comes from this answer on Stack Overflow.

remove_action( 'wp_head', 'feed_links_extra', 3 ); // Display the links to the extra feeds such as category feeds
remove_action( 'wp_head', 'feed_links', 2 ); // Display the links to the general feeds: Post and Comment Feed
remove_action( 'wp_head', 'rsd_link' ); // Display the link to the Really Simple Discovery service endpoint, EditURI link
remove_action( 'wp_head', 'wlwmanifest_link' ); // Display the link to the Windows Live Writer manifest file.
remove_action( 'wp_head', 'index_rel_link' ); // index link
remove_action( 'wp_head', 'parent_post_rel_link', 10, 0 ); // prev link
remove_action( 'wp_head', 'start_post_rel_link', 10, 0 ); // start link
remove_action( 'wp_head', 'adjacent_posts_rel_link', 10, 0 ); // Display relational links for the posts adjacent to the current post.

And then, one item that isn’t in functions.php, Get rid off all the <link rel="pingback".... lines by installing the bye-bye-pingback plugin.

The theme was pretty old, based on Kubrik from around 2009 and some of the changes actually needed to be done via changes to theme files (e.g. remove the blog’s overall RSS feed), but with all these changes in place, I can now run Wget one last time and get a clean copy of the blog.

Generating Images from HTML

Editing images is hard. Moving things to the right location, adding other elements, going back to the first one and readjusting the location or size. And if you want to create multiple images with just a slightly different bit of text, or a different subject in the foreground…..

I’ve known people who can create masterpieces of art with PhotoShop and the like, but I’ve never developed the knack.

A while back, it occurred to me that I could do all kinds of fancy “this-goes-in-front-of-that” and rearranging things in a web page. Then I could just take a screenshot, do a little cropping and resizing (the secret to some of my best photos) and voilà, exactly the kind of image I wanted! And if I needed to make several such photos, well, web pages are just plain text and very easy to edit.

That’s great for a small number of images, but if you want to make a bunch of images (say, social media previews for 40 biographies), that would get tedious quickly.

The best way to deal with tedious tasks is automation.

So I created an automated HTML to Image Generator (it really needs a better name).

The idea behind it is you start off with a simple web page like this one:

<body>
	<div class="container">
		<img src="image/frog.png">
		<p class="name">Green</p>
	</div>
</body>

which creates a page looking like this:

Replace a few elements in the HTML with placeholders

<body>
	<div class="container">
		<img src="{{image}}">
		<p class="name">{{name}}</p>
	</div>
</body>

and then create a set of data files containing other values for those those placeholders. For example, this data file

{
    "name": "Yellow",
    "image": "image/sun.png",
    "colorCode": "#cccc00"
}

Creates this image

You can check out the whole thing in the HTML to Image Generator’s GitHub repository.

I hope someone finds it useful, and if you have suggestions for a better name, leave a message in the comments below.

Rubber Duck Debugging

There is a bit of dev folklore about a developer who had the experience of people coming to ask for help with problems they had encountered. What kept happening was  that they would stop midway through explaining the problem and walk away with a solution. All without the dev saying a thing.

After this happened a few times, the dev realized his participation in the process might not be required. To test this theory, he put a rubber duck on his desk.

The rule was, if you wanted to ask a question, you first had to explain the problem to the duck. Amazingly, explaining the problem to the duck had the same success rate as explaining the problem to the dev.

This practice has become known as “Rubber Duck Debugging.”

I’m not saying I’ve ever engaged in rubber duck debugging, but just yesterday I stopped partway through entering a support ticket and implemented the solution without any involvement from the support team….

Home Assistant: Text to Speech and URLs

This is one of those “In case I run into this again” type of posts, with the hope that it might help someone else too.

I’ve been trying to get Home Assistant’s text to speech integration working, but when I try to play anything via the developer tools or even a smart speaker’s entity card, all I get is a beep but no speech. I haven’t much use for it until recently, but I know it was working at one time, so something must have changed.

What I finally figured out is that my Home Assistant instance was misconfigured. Under Configuration > General, there are two URL settings. One is “External URL”, which is the URL to use for accessing your Home Assistant instance from outside your house. The other is “Internal URL” which is the URL to use from devices which are on your home network.

A few months ago, I set up Let’s Encrypt with DuckDNS so I could securely use the Home Assistant companion app from outside the house. This had the side effect of making it so the assistant could only be contacted via https. It’s still on port 8123 though, so there’s really no place to redirect from.

What does all of this have to do with Home Assistant? The TLS certificate associated with my setup only works for the name I setup with DuckDNS, so I’ve been using that name and hadn’t noticed that Home Assistant’s “Internal URL” was set to the RaspberryPi’s IP address instead of the DuckDNS name. So when my smart speaker attempted to retrieve the audio file from that URL, the HTTP connection it was using failed.

I updated the internal URL to match the DuckDNS name, and voila! I can now play speech through my smart speakers.

Turning off Web Proxy Auto-Discovery Protocol (WPAD)

Along with blocking some trackers, running my own DNS with Pi-hole gives me the “super power” of being able to see what DNS queries my computers are doing. This morning, I happened to notice that my desktop PC had made a bunch of lookups for “wpad.lan”.

Pi-hole appends “.lan” to the name of any machine on the local network, but that’s not a name I recognized. So what’s going on here?

Googling for “wpad.lan” lead me to discover that it’s a protocol for automatically discovering and configuring proxy servers. Most operating systems have it off by default, but Windows defaults it to on. More concerning, having proxy auto-discovery turned on is a security concern. Not so much on a home or corporate network (indeed, it’s likely helpful for corporate networks, which is perhaps why it’s on by default), but if you have it on and connect to a public network (e.g. a coffee shop, library, etc.) an attacker may be able to see all the details of your http requests (not breaking https, but working around it).

The desktop PC isn’t super-portable, so I’m not too concerned about unfamiliar WiFi, but apparently this is even a risk if you’re using VPN, so I definitely want to lockdown the laptops.

A bit more digging led me to a How-To Geek article summarizing the problem and including detailed instructions on how to turn off the auto-discovery.

In a nutshell:

  1. Launch the settings app
  2. Go to “Network & Internet”
  3. In the left navigation, choose “Proxy”
  4. Turn off the slider for “Automatically detect settings.”

Troubleshooting puppeteer in WSL2

I’m working on a small project to generate image files from HTML using a web browser. This is something I’ve toyed with for a while, but never really dug into canvas far enough. Once I discovered the puppeteer package for node, the dream seemed suddenly within reach.

Everything was going along fine, until I got to the point of actually trying to launch the headless browser. Then my program started crashing with the message:

(node:4279) UnhandledPromiseRejectionWarning: Error: Failed to launch the browser process!
/mnt/c/Users/blair/git/image-gen/node_modules/puppeteer/.local-chromium/linux-818858/chrome-linux/chrome: error while loading shared libraries: libnss3.so: cannot open shared object file: No such file or directory

The message included a link to a troubleshooting guide, which did mention some tips for Windows, but that was the Windows GUI environment and I’m using Ubuntu 20.04, running under the Windows Subsystem for Linux (WSL2). That meant it was either fix it myself, fire up a VM, or install node under Windows (which would mean losing the node version manager tool).

One of my main reasons for doing Node development in Linux is the ability to use nvm. A VM is much too heavy a solution for my tastes, so I wanted to see if I could get it working. And off to Google I went.

Searching for the error message is my usual first step, but although it turned up plenty of other people having problems (plus a few open GitHub issues from several years ago), it didn’t offer any solutions. Finally, a search for “puppeter wsl2 libnss3.so” led to a comment on an issue from last June where someone got it running by installing a bunch of packages manually.

0ne of the nice things about WSL is if you break your installation badly, it’s fairly trivial to remove it and reinstall a new copy. So it was fairly low risk to try installing the missing pieces to see if I could get it to work.

The error message even gave me a starting point: “error while loading shared libraries: libnss3.so: cannot open shared object file: No such file or directory.”

There’s a page at https://packages.ubuntu.com/ which allows you to search for which package a library comes from. I started by putting libnss3 in the keyword field and specifying focal (aka “20.04”) as the distribution, and began the iterative process of looking up the installing the missing packages, trying my program again, and then looking up the next failed package. Happily, all it took was a half-dozen tries before my script started working again.

Here’s the list:

libnss3
libatk-adaptor
libcups2
libxkbcommon0
libgtk-3-0
libgbm1

Full-disclosure: midway through, it occurred to me that the reason the packages were missing might be because WSL isn’t a GUI environment and therefore doesn’t have a browser installed. Running sudo apt install -y chromium-browser didn’t solve the problem, but it is possible that this installed some additional packages which I was then able to avoid installing manually.

Now to see if I can get it to render a page. ?

Notes on switching to Mac

A friend recently announced her job was requiring her to use a Mac, but she’d only ever used Windows and could anyone help her get started?

A similar work-related transition caused me to add Mac to my skillset a couple years ago and this request for assistance was the final push I needed to get my notes organized; here they are in a form that will perhaps help others as well.

I’m keyboard-oriented, so a lot of this focuses on using the keyboard and keyboard shortcuts.

Keyboard Navigation

One of the biggest changes from Windows to Mac is that for most things, where Windows uses the control (Ctrl) key, Mac uses the command (Cmd) key. It’s the one that looks like a square with loops on the corners. (If you plug a Windows keyboard into a Mac, you’ll use the “Windows” key as the command key.)

The control key does still get used, but it tends to be more dependent on the individual program.

Here’s a quick list of common keyboard shortcuts. Apple has a longer list in a support document at https://support.apple.com/en-us/HT201236.

FunctionWindowsMac
CopyCtrl-CCmd-C
CutCtrl-XCmd-X
PasteCtrl-VCmd-V
Move to start of lineHomeCmd-left arrow
Move to end of lineEndCmd-right arrow
Move to previous wordCtrl-left arrowOption-left arrow
Move to next wordCtrl-right arrowOption-right arrow
UndoCtrl-ZCmd-Z
Redo (undo the undo)Ctrl-YShift-Cmd-Z

Switching between programs

On Windows, you can “Alt-Tab” to switch between programs. On Mac, you use Command-Tab to switch between programs, but it doesn’t work the way Windows does. If you have multiple copies of Word open, Command-Tab will bring them ALL to the foreground.

To switch between instances of the same program (e.g. Switch between a meeting agenda and a report) use Command-` (That’s the key in the far upper-left of the keyboard, usually between Escape and Tab. It’s also known as the “backtick” or accent key. The “uppercase” version of that key is the tilde.)

Navigating the file system

On Windows, you navigate the file system with Windows Explorer. On Mac, it’s the Finder. This is the blue “smiley face” which appears in the “Dock.” (When I started using Mac, this was at the bottom of the screen, with the Finder icon on the left. Your mileage may vary.)

Launching Programs

There are at least two ways to launch applications

I find the fastest way to launch a program is by holding down the command key and pressing the space bar. This causes a prompt to appear where you can type the name of the program you want to run. As soon as you’ve typed enough for the program name to be selected, hit the Enter key to launch it. (This is the “Spotlight Search.)

Alternatively, in the finder, the area on the left includes an “Applications” tab. If you click on that, you’ll be presented with a list of installed applications.

Once a program has been launched, it will appear in the dock. You can right click on the application and choose to have it remain in the dock, even if it’s not running.

Macworld has a list of five ways to launch an app at:
https://www.macworld.com/article/3108469/5-ways-to-launch-mac-apps-from-the-keyboard.html

Screenshots

Mac keyboards don’t have a print screen button. If you plug in a Windows keyboard, the print screen button won’t do anything.

To take a screenshot in Mac, hold down the Command and Shift keys and then press the 4. You then use the mouse to select the area of the screen you wish to capture. Afterward, a thumbnail image will appear at the bottom right of the screen for 5-10 seconds. Click on the thumbnail to access the full-size image which you can then perform some rudimentary editing on before using Command-C to copy it into another program. (This is similar to the Windows-Shift-S functionality recently added to Windows 10.)

Along with Cmd-Shift-4, Apple’s list of keyboard shortcuts says you can also use Cmd-Shift-3 and (in newer versions of the OS) Cmd-Shift-5. (This latter apparently gives you an ability to record the screen which I wasn’t aware of before writing this.)

Apple offers a support article on screenshots at https://support.apple.com/en-us/HT201361

Program preferences

In Windows, programs are free to use whatever conventions they wish to launch program settings (generally a “Settings” item in the “File” menu, or sometimes “Preferences” under the “Edit” menu).

On Mac, program preferences are always (almost always?) accessible via a “Preferences” item on the menu item with the program’s name. This may also be accessed via the Command-Comma keyboard shortcut.

Accessing the Menu Bar

As mentioned at the beginning, I’m keyboard-oriented. I’ve not found a reliable way to do this. According to an article on c|net titled “Access menus via the keyboard in OSX“, you can use Command-F2.

Unfortunately, on newer Macbooks equipped with a touchbar, the function keys aren’t always available. As an alternative, you can use Command-Shift-/ (aka “Command-?”) to get into the Help search menu item. I find that to be enough of a hassle that using the mouse is easier.

Helpful Bookmarks