I’m putting together a small collection of pages to share with family. A CMS would be overkill for this, so I’m creating the HTML by hand (and sometimes I enjoy doing this stuff by hand).
I’ve reached the point where I’m adding text, describing the photos and the memories they bring back. And because I’m using static HTML files, I’m using Visual Studio Code.
The problem is, the GitHub Co-Pilot that’s useful for auto-completing some of the boilerplate, also wants to chime in and offer suggestions for the text of my memories. Not only is this distracting, but some of the text is wildly inaccurate (after all, these are my memories, not the bot’s). So, how do you turn this off?
It turns out this is relatively simple:
Go into the Command Palette (Ctrl-Shift-P or Command-Shift-P)
I’m running a WordPress instance on a Zimaboard on the home network. Normally, that’s the kind of thing I’d put on the paid hosting service so I can let someone else worry about patching the OS and such, but since family calendars and the like don’t need to be on the public internet, I decided to do this one in-house.
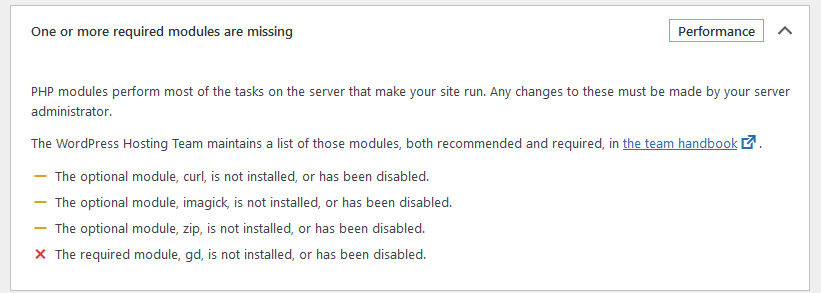
Once I got WordPress up and running, I checked the “Site Health” and along with some old themes that needed to be cleaned up, there was a notice of a critical issue, telling me that “One or more required modules are missing.”
Expanding the dropdown, I saw the list included curl, imagick, zip, and gd. I tried to be thorough when installing PHP, but evidently missed a few. No biggie. Here’s how to fix it.
This is all running on Ubuntu, so the first step is to update the list of available packages. Because you always do that first.
$ sudo apt update -y
Next, install the missing packages. These are php modules, so the package to install is named “php-” and then the module name. (e.g. php-curl).
My machine is running PHP 8.1, so apt determined that the correct packages to install were php8.1-gd, php8.1-imagick, php8.1-curl, and php8.1-zip
Now I know the php-imagick module depends on ImageMagick, so I wanted to make sure that was installed, so after checking the apt command’s help text, I ran apt list -a ImageMagick
$ apt list -a ImageMagick
Listing... Done
imagemagick/jammy-updates,jammy-security,now 8:6.9.11.60+dfsg-1.3ubuntu0.22.04.3 amd64 [installed]
imagemagick/jammy 8:6.9.11.60+dfsg-1.3build2 amd64
Excellent. Everything should be good now right? That’s what I thought, but WordPress disagreed. Returning the Site Health page, the same message appeared, telling me that “One or more required modules are missing.”
I had to scratch my head for a bit on that one. Then I remembered, you don’t just install PHP modules, you also have to tell PHP you want to use them. (For example, Xdebug notoriously causes programs to run more slowly.)
I keep losing track of the file where I have these steps written down. It’s past time to put them someplace where I can find them, and perhaps help a few others as well.
create database SOME_DATABASE;
create user 'SOME_USER'@'localhost' IDENTIFIED BY 'A_STRONG_PASSWORD';
GRANT ALL ON SOME_DATABASE.* TO 'SOME_USER'@'localhost';
The database permissions grant can be fine-tuned a bit, e.g. after installation, remove the DROP, ALTER, and GRANT permissions. (This does, of course, depend on what your plugins are doing, and potentially the needs of a particular major version upgrade.)
Today I learned you can set default output options for the dig command by creating a .digrc file in your home directory.
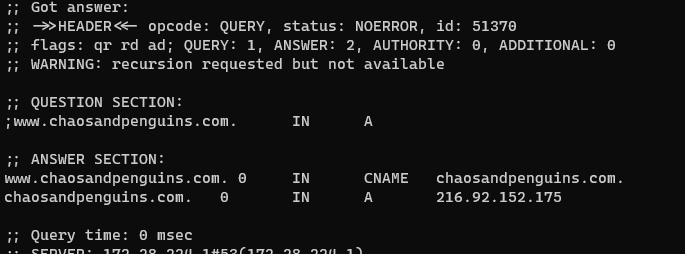
Ordinally, running the command dig www.chaosandpenguins.com, the result is this rather hefty block of text.
$ dig www.chaosandpenguins.com

; <<>> DiG 9.16.1-Ubuntu <<>> www.chaosandpenguins.com
;; global options: +cmd
;; Got answer:
;; ->>HEADER<<- opcode: QUERY, status: NOERROR, id: 40732
;; flags: qr rd ad; QUERY: 1, ANSWER: 2, AUTHORITY: 0, ADDITIONAL: 0
;; WARNING: recursion requested but not available

;; QUESTION SECTION:
;www.chaosandpenguins.com.      IN      A

;; ANSWER SECTION:
www.chaosandpenguins.com. 0     IN      CNAME   chaosandpenguins.com.
chaosandpenguins.com.   0       IN      A       216.92.152.175

;; Query time: 0 msec
;; SERVER: 172.28.224.1#53(172.28.224.1)
;; WHEN: Wed Nov 16 23:13:00 EST 2022
;; MSG SIZE  rcvd: 136
That’s a whole lot of text. So let’s add a couple options. +noall turns off everything. Running dig www.chaosandpenguins.com +noall would literally return nothing at all. To bring back the answer section (which is what I’m interested in most of the time), you add the +answer option.
$ dig www.chaosandpenguins.com +noall +answer
www.chaosandpenguins.com. 0     IN      CNAME   chaosandpenguins.com.
chaosandpenguins.com.   0       IN      A       216.92.152.175
That’s much more compact , but getting it requires some extra typing. And I want that version of the output most of the time, so wouldn’t it be nice if there was to make that the default?
This is where the .digrc file comes in. You create it in your home directory and just put in a single line containing the options you want. So, to make +noall +answer the defaults, I just run this command:
$ echo +noall +answer > ~/.digrc
And now when I run dig www.chaosandpenguins.com without any options, here’s the default output:
$ dig www.chaosandpenguins.com
www.chaosandpenguins.com. 0 IN CNAME chaosandpenguins.com.
chaosandpenguins.com. 0 IN A 216.92.152.175
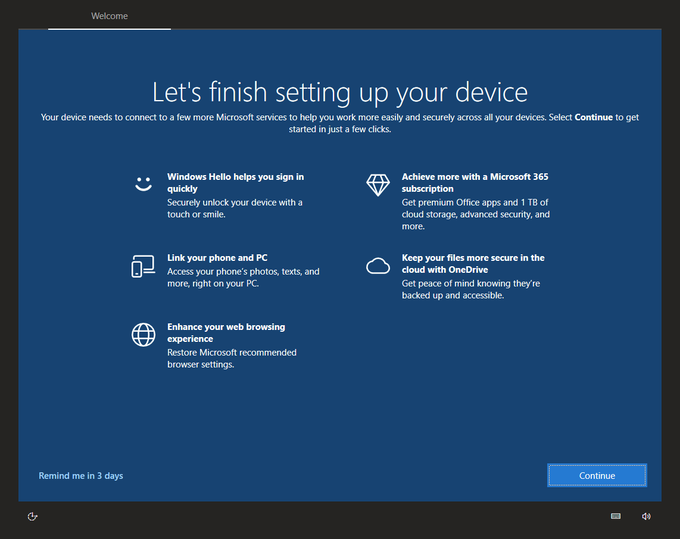
One of my peeves with Windows 10 is occasionally I’ll get a screen saying “Let’s finish setting up your device.” (Uh, I finished setting it up a couple years ago, why do you keep suggesting this?)
This evening, I spotted a post on Twitter from @MrTurner asking how to get rid of that prompt. Great question! And there was an equally awesome reply from @Lucas_Trz with the answer.
It's in the settings, in System, Notifications & Actions: "Show me the Windows welcome experience after updates and occasionally"
Go into settings (click the Start button, and then the “gear” icon), click
Click “System”
Click “Notifications & actions”
Uncheck the box next to the text that starts off with “Show me the Windows welcome experience after updates and occasionally” (I’d like to suggest you might want to uncheck a few other things as well.)
Going forward, this is on my list of things I’ll do any time I reinstall Windows. Right next to turning off the feedback surveys.
Cover image by twitter user @MrTurnerj, used in the context of a critique of Windows.
Another entry in the “So I can look this up later” series.
I’ve been trying to hook up some Phillips Hue bulbs to the Google Assistant. To do that, you need to link your Hue and Google accounts. That’s not a problem, except I didn’t have a Hue account….
The online help and several searches said to create it through the Hue app. I think there was an option to do that when I first installed the app, but I didn’t want to create yet another online account just then and skipped it. And now that I wanted to create one, I couldn’t find an option to do so. (This is where someone will inevitably chime in with, “Just click on this item, and then click such-and-such….” and I don’t know what to say to that except that I spent a good long time digging though the app, clicking every option I could find.)
Long story short, I finally discovered you can go to https://account.meethue.com and create an account there. Once you’ve done that, and assuming you’re on the same network as the Hue bridge, you click a button on the web site, push the button on the bridge, and through some magic I don’t quite understand, the browser will detect your bridge and link it to your account.
I’m working on a project where I need to send email from my Raspberry Pi. Installing a full-blown SMTP server would be overkill, I just need something where I can send messages from a bash script.
A brief search led me to a forum post from 2013 which talked about configuring the ssmtp package. That post in turn referenced a step-by-step guide from 2009. Unfortunately, both seem to be out of date, and the latter is for installing it on CentOS?RHEL/RedHat/Fedora. So here’s my attempt at an updated version for the Pi (which should apply to any Debian-based Linux distribution).
Notes
These instructions send via Gmail. If you’re using two-factor authentication (and you really should), you’ll need to set up an application -specific password. Otherwise, you’ll get authentication errors.
The password is stored in plain text. This solution is not suitable for use on a shared system.
I also set the root= setting to my email address. I don’t believe this is necessary, but it does allow me to get notified when something goes wrong with one of my messages. (The way I first found out my configuration was working was a message from a cron job which had some unexpected output.)
Testing
Part of the installation is to set up a symlink so that sendmail becomes an alias for ssmtp. You can use either command.
The ssmtp command doesn’t seem to include command-line options for specifying the subject line or the name of the recipient..
So, here’s a command line you can use. Edit the email address as suits your needs. (The sender name and email address will be embedded by GMail.)
Ignore the word-wrap, this is all one line.
echo -e "Subject: Test Message\nTo: Your Name Here <you@example.com>\nThis message was sent via ssmtp." | ssmtp -t
Alternatively, you can put the recipient’s email address on the command line (the message will then be received as a BCC).
echo -e "Subject: Test Message\nThis message was sent via ssmtp." | ssmtp you@example.com
Troubleshooting
Four files are written to /var/logs
mail.err – contains an entry for each time there’s a problem sending a message.
mail.info – contains an entry for each attempt (successful or failed) at sending a message
This has the potential to be dangerous. ? I was writing an email to a friend and wanted it to be perfectly clear that what I was writing was joke. I find the purely textual emoticons such as the sideways smiley 🙂 are often mistaken for punctuation and their intent lost, so I wanted to use a graphical emoji. We both use GMail, but I don’t care for the “melted lump” characters Google put in there.
On a whim, I did a search for how to type emoji on windows 10 and found a PC World article explaining how to type emoji if you have the Fall Creators Update. My immediate thought was to wonder if it was safe to assume everyone had it yet, and then I realized the article was from 2017! So the feature’s been there for a while and I just didn’t know about it.
So, if you on Windows 10, you can type emoji by pressing the Windows Key, followed by either the period or the semi-colon, and an emoji keyboard will appear. This is much more convenient – and universal – than any per-website or per-application emoji button.
Don’t get me wrong, I’m not a huge fan of emoji, but sometimes you just really want to type ? or ✈ without first visiting emojipedia. ?
(Only bummer on this is GMail replaces the emoji characters with the “melted lump” equivalents.)
By the way, Mac users can do the same by pressing and holding down both the [Control] and [Command] keys and then hitting the space bar.
PayPal business accounts allow you to set up separate logins with restricted access to the account. So for example, you need to have someone who can send invoices and issue refunds, but isn’t allowed to send money.
The accounts have separate passwords from the master account. Changing the password for one of these subaccounts is simpler than for the master account, but the process isn’t completely obvious if you don’t know what all the icons mean. (This was accurate at the time it was written, but user interfaces do change.)
Login to PayPal.
In the upper right corner of the page, click on the gear icon.
From the menu, click “Your Profile.”
In the “Password” row, click “Update”
Enter the current password in the “Confirm your current password” field.
Enter the new password twice (once for confirmation)
I use Windows, Linux and Mac. I hop between them several times a day and find that each has its own strengths and annoyances.
This evening, Windows presented me with a prompt, asking how hard it is to customize Windows. It took me out of my workflow, distracting me from the task I originally wanted to work on.
As a society, we get a lot of surveys. Because if asking a small sample of consumers what they think of a product will give useful information, then asking a large group will surely give the survey takers an even better idea of what’s going on.
And so, we get surveys on the receipts at restaurants and home improvement stores. We get feedback requests from apps on our phones. (We probably get surveyed on drug store receipts, but it’s hard to tell with all the coupons.) And now we’re being prompted for feedback from the computer’s operating system.
Here’s how to (hopefully) remove that one: At least, until they add another survey tool.
Go to the settings app (Windows key + I
In the search, type “Feedback”
Select “Diagnostics & feedback settings.”
Scroll down. About 2/3 of the way down the page, you’ll find a box for selecting “Feedback frequency”, labeled “Windows should as for my feedback.” By default, this will say “Automatically (Recommended).”
Change the setting to suit. (I chose “Never.”)
I’ll update this post as I find other feedback prompts to disable.