Troubleshooting puppeteer in WSL2

I’m working on a small project to generate image files from HTML using a web browser. This is something I’ve toyed with for a while, but never really dug into canvas far enough. Once I discovered the puppeteer package for node, the dream seemed suddenly within reach.

Everything was going along fine, until I got to the point of actually trying to launch the headless browser. Then my program started crashing with the message:

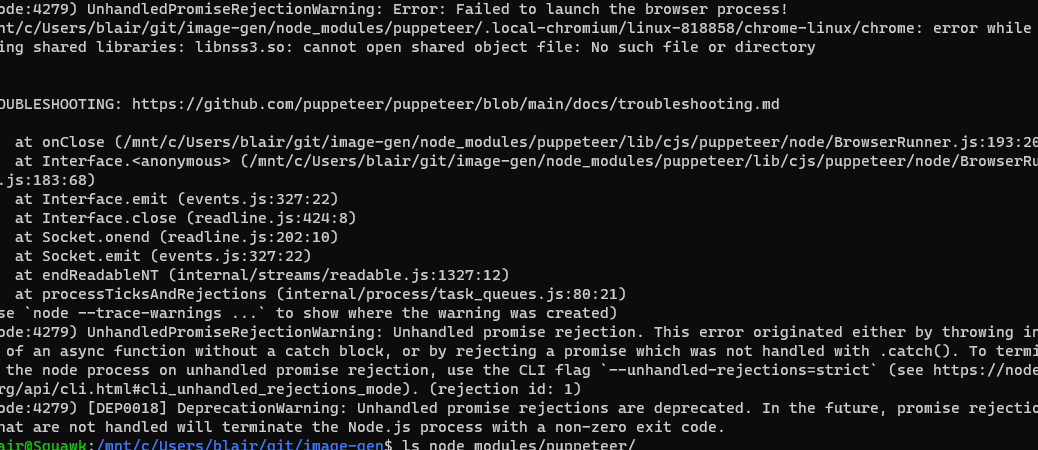
(node:4279) UnhandledPromiseRejectionWarning: Error: Failed to launch the browser process!
/mnt/c/Users/blair/git/image-gen/node_modules/puppeteer/.local-chromium/linux-818858/chrome-linux/chrome: error while loading shared libraries: libnss3.so: cannot open shared object file: No such file or directory

The message included a link to a troubleshooting guide, which did mention some tips for Windows, but that was the Windows GUI environment and I’m using Ubuntu 20.04, running under the Windows Subsystem for Linux (WSL2). That meant it was either fix it myself, fire up a VM, or install node under Windows (which would mean losing the node version manager tool).

One of my main reasons for doing Node development in Linux is the ability to use nvm. A VM is much too heavy a solution for my tastes, so I wanted to see if I could get it working. And off to Google I went.

Searching for the error message is my usual first step, but although it turned up plenty of other people having problems (plus a few open GitHub issues from several years ago), it didn’t offer any solutions. Finally, a search for “puppeter wsl2 libnss3.so” led to a comment on an issue from last June where someone got it running by installing a bunch of packages manually.

0ne of the nice things about WSL is if you break your installation badly, it’s fairly trivial to remove it and reinstall a new copy. So it was fairly low risk to try installing the missing pieces to see if I could get it to work.

The error message even gave me a starting point: “error while loading shared libraries: libnss3.so: cannot open shared object file: No such file or directory.”

There’s a page at https://packages.ubuntu.com/ which allows you to search for which package a library comes from. I started by putting libnss3 in the keyword field and specifying focal (aka “20.04”) as the distribution, and began the iterative process of looking up the installing the missing packages, trying my program again, and then looking up the next failed package. Happily, all it took was a half-dozen tries before my script started working again.

Here’s the list:

libnss3
libatk-adaptor
libcups2
libxkbcommon0
libgtk-3-0
libgbm1

Full-disclosure: midway through, it occurred to me that the reason the packages were missing might be because WSL isn’t a GUI environment and therefore doesn’t have a browser installed. Running sudo apt install -y chromium-browser didn’t solve the problem, but it is possible that this installed some additional packages which I was then able to avoid installing manually.

Now to see if I can get it to render a page. ?

Notes on switching to Mac

A friend recently announced her job was requiring her to use a Mac, but she’d only ever used Windows and could anyone help her get started?

A similar work-related transition caused me to add Mac to my skillset a couple years ago and this request for assistance was the final push I needed to get my notes organized; here they are in a form that will perhaps help others as well.

I’m keyboard-oriented, so a lot of this focuses on using the keyboard and keyboard shortcuts.

Keyboard Navigation

One of the biggest changes from Windows to Mac is that for most things, where Windows uses the control (Ctrl) key, Mac uses the command (Cmd) key. It’s the one that looks like a square with loops on the corners. (If you plug a Windows keyboard into a Mac, you’ll use the “Windows” key as the command key.)

The control key does still get used, but it tends to be more dependent on the individual program.

Here’s a quick list of common keyboard shortcuts. Apple has a longer list in a support document at https://support.apple.com/en-us/HT201236.

FunctionWindowsMac
CopyCtrl-CCmd-C
CutCtrl-XCmd-X
PasteCtrl-VCmd-V
Move to start of lineHomeCmd-left arrow
Move to end of lineEndCmd-right arrow
Move to previous wordCtrl-left arrowOption-left arrow
Move to next wordCtrl-right arrowOption-right arrow
UndoCtrl-ZCmd-Z
Redo (undo the undo)Ctrl-YShift-Cmd-Z

Switching between programs

On Windows, you can “Alt-Tab” to switch between programs. On Mac, you use Command-Tab to switch between programs, but it doesn’t work the way Windows does. If you have multiple copies of Word open, Command-Tab will bring them ALL to the foreground.

To switch between instances of the same program (e.g. Switch between a meeting agenda and a report) use Command-` (That’s the key in the far upper-left of the keyboard, usually between Escape and Tab. It’s also known as the “backtick” or accent key. The “uppercase” version of that key is the tilde.)

Navigating the file system

On Windows, you navigate the file system with Windows Explorer. On Mac, it’s the Finder. This is the blue “smiley face” which appears in the “Dock.” (When I started using Mac, this was at the bottom of the screen, with the Finder icon on the left. Your mileage may vary.)

Launching Programs

There are at least two ways to launch applications

I find the fastest way to launch a program is by holding down the command key and pressing the space bar. This causes a prompt to appear where you can type the name of the program you want to run. As soon as you’ve typed enough for the program name to be selected, hit the Enter key to launch it. (This is the “Spotlight Search.)

Alternatively, in the finder, the area on the left includes an “Applications” tab. If you click on that, you’ll be presented with a list of installed applications.

Once a program has been launched, it will appear in the dock. You can right click on the application and choose to have it remain in the dock, even if it’s not running.

Macworld has a list of five ways to launch an app at:
https://www.macworld.com/article/3108469/5-ways-to-launch-mac-apps-from-the-keyboard.html

Screenshots

Mac keyboards don’t have a print screen button. If you plug in a Windows keyboard, the print screen button won’t do anything.

To take a screenshot in Mac, hold down the Command and Shift keys and then press the 4. You then use the mouse to select the area of the screen you wish to capture. Afterward, a thumbnail image will appear at the bottom right of the screen for 5-10 seconds. Click on the thumbnail to access the full-size image which you can then perform some rudimentary editing on before using Command-C to copy it into another program. (This is similar to the Windows-Shift-S functionality recently added to Windows 10.)

Along with Cmd-Shift-4, Apple’s list of keyboard shortcuts says you can also use Cmd-Shift-3 and (in newer versions of the OS) Cmd-Shift-5. (This latter apparently gives you an ability to record the screen which I wasn’t aware of before writing this.)

Apple offers a support article on screenshots at https://support.apple.com/en-us/HT201361

Program preferences

In Windows, programs are free to use whatever conventions they wish to launch program settings (generally a “Settings” item in the “File” menu, or sometimes “Preferences” under the “Edit” menu).

On Mac, program preferences are always (almost always?) accessible via a “Preferences” item on the menu item with the program’s name. This may also be accessed via the Command-Comma keyboard shortcut.

Accessing the Menu Bar

As mentioned at the beginning, I’m keyboard-oriented. I’ve not found a reliable way to do this. According to an article on c|net titled “Access menus via the keyboard in OSX“, you can use Command-F2.

Unfortunately, on newer Macbooks equipped with a touchbar, the function keys aren’t always available. As an alternative, you can use Command-Shift-/ (aka “Command-?”) to get into the Help search menu item. I find that to be enough of a hassle that using the mouse is easier.

Helpful Bookmarks