Setting defaults for the dig command

Today I learned you can set default output options for the dig command by creating a .digrc file in your home directory.

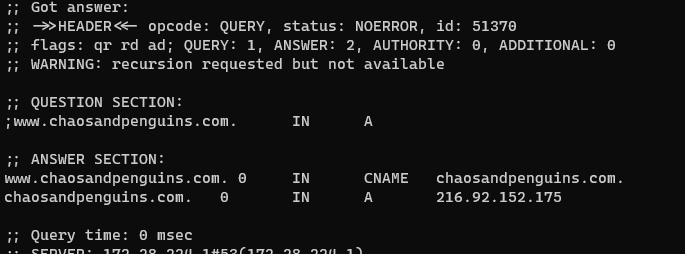
Ordinally, running the command dig www.chaosandpenguins.com, the result is this rather hefty block of text.

$ dig www.chaosandpenguins.com

; <<>> DiG 9.16.1-Ubuntu <<>> www.chaosandpenguins.com
;; global options: +cmd
;; Got answer:
;; ->>HEADER<<- opcode: QUERY, status: NOERROR, id: 40732
;; flags: qr rd ad; QUERY: 1, ANSWER: 2, AUTHORITY: 0, ADDITIONAL: 0
;; WARNING: recursion requested but not available

;; QUESTION SECTION:
;www.chaosandpenguins.com.      IN      A

;; ANSWER SECTION:
www.chaosandpenguins.com. 0     IN      CNAME   chaosandpenguins.com.
chaosandpenguins.com.   0       IN      A       216.92.152.175

;; Query time: 0 msec
;; SERVER: 172.28.224.1#53(172.28.224.1)
;; WHEN: Wed Nov 16 23:13:00 EST 2022
;; MSG SIZE  rcvd: 136

That’s a whole lot of text. So let’s add a couple options. +noall turns off everything. Running dig www.chaosandpenguins.com +noall would literally return nothing at all. To bring back the answer section (which is what I’m interested in most of the time), you add the +answer option.

$ dig www.chaosandpenguins.com +noall +answer
www.chaosandpenguins.com. 0     IN      CNAME   chaosandpenguins.com.
chaosandpenguins.com.   0       IN      A       216.92.152.175

That’s much more compact , but getting it requires some extra typing. And I want that version of the output most of the time, so wouldn’t it be nice if there was to make that the default?

This is where the .digrc file comes in. You create it in your home directory and just put in a single line containing the options you want. So, to make +noall +answer the defaults, I just run this command:

$ echo +noall +answer > ~/.digrc

And now when I run dig www.chaosandpenguins.com without any options, here’s the default output:

$ dig www.chaosandpenguins.com
www.chaosandpenguins.com. 0 IN CNAME chaosandpenguins.com.
chaosandpenguins.com. 0 IN A 216.92.152.175

Getting Verified on Mastodon

I’m not leaving Twitter, not yet anyhow, but over the weekend I decided to dip my toes in the water and check out Mastodon. I’m still collecting my thoughts on the topic (more on that later perhaps), but in the meantime, let’s talk about how to get verified.

Last week, Twitter announced you’d soon be able to get verified (i.e. a blue checkmark confirming that you’re who you say you are) by paying eight dollars a month. I think they’ve missed the boat.

For me, verification isn’t “Oh, this person’s name really is ‘Roy Kent.” It’s about verifying the account belongs to the same Roy Kent who used to play for AFC Richmond and not someone who coincidentally has the same name and uploaded the other guy’s publicity photo. (Update November 13, 2022: Oh wow! I thought they’d at least check that the name matched what was on the credit card. Instead, the blue check mark has gone from “This person is who they claim to be” to something more akin to the The Star-bellied Sneetches.)

Being a collection of independent web sites, verification on Mastodon doesn’t work quite the same way. It’s quite possible (and arguably, desirable) that @thatblairguy@mstdn.social and thatblairguy@mastodon.social (or any other server) are different people.

The “tricky” part is, you need your online identity to be more than “I’m this person on this particular social media site.” (If your identity really is, “I’m this person on this particular social media site,” I don’t understand the value of verification – if you’re only on one site, where else do people know you from?)

If you do have a web site (or really, any page you control), you can link to it from your Mastodon profile. Then, while on the “Edit your profile” page, copy the verification link and put that on the page you linked to. This causes Mastodon to display the link to that page in green, meaning “verified.” (Or, put another way, “The person controlling that other site is also the person who controls this profile.”)

Using my own profile as an example, here’s how to do it (some of the details may vary between servers, but I believe the general steps will be the same):

Step 1: Edit your profile.

Step 2: Scroll down to the “Profile metadata” section. And put in both a label and a link to your website. (I labeled mine as “website” but you can use whatever text you want.)

Step 3: Click “Save Changes”. (This saves your work, but you’re not verified yet.)

Profile metadata block listing thatblairguy.com and chaosandpenguins.com as web sites I control.

At this point, your mastodon profile will show a link to your web site, but it won’t display that you’ve verified the ownership. You might still be some rando trying to claim that you own someone else’s web site. Next, you have to prove that you own the page you’ve linked to.

Step 4: Scroll back down to the “Profile metadata” section and click the “Copy” button under the verification text. This puts a link into your paste buffer, for my account, it looks like this:

<a rel="me" href="https://mstdn.social/@ThatBlairGuy">Mastodon</a>

Place that link somewhere on the page and after a short while, your profile page will show the link to your web site with a highlight, verifying that you’re the same person who controls that page.

Do bear in mind that it might take a few minutes for the highlight to show up. Most mastodon servers are being run by volunteers and at the moment, they’re under a heavy load with people moving from Twitter.

Profile showing thatblairguy.com and chaosandpenguins.com as verified.

Oh, and if you really, really want a checkmark next to your name, you can add an emoji as part of your display name. ✅