Sometime in the mid-to-late 80s, my brothers and I got hooked on a very early text adventure game called “Camel”. The premise is that you’re fleeing across the desert on a camel, being chased by “pygmies.”
I don’t recall how we obtained the game; I do remember loading it from a floppy disk, but I’m not sure whether we bought the disk preloaded or if someone typed it in from a magazine, but we played it enough times that some of the program’s outputs have been a running joke in my family for decades.
The line “Your camel thanks you” (displayed when the player chose to stop for the night) came up again this weekend. This inspired me to see if I could find the BASIC program online.
I’m putting together a small collection of pages to share with family. A CMS would be overkill for this, so I’m creating the HTML by hand (and sometimes I enjoy doing this stuff by hand).
I’ve reached the point where I’m adding text, describing the photos and the memories they bring back. And because I’m using static HTML files, I’m using Visual Studio Code.
The problem is, the GitHub Co-Pilot that’s useful for auto-completing some of the boilerplate, also wants to chime in and offer suggestions for the text of my memories. Not only is this distracting, but some of the text is wildly inaccurate (after all, these are my memories, not the bot’s). So, how do you turn this off?
It turns out this is relatively simple:
Go into the Command Palette (Ctrl-Shift-P or Command-Shift-P)
Did you know the MacOS “Preview” tool can be used to capture the text in a photo of a sign? All you do is click on the first word, and then drag the mouse until all the text is selected. Press Command-C, and then you paste the text into another document. (The Windows Snipping tool has similar functionality, though I’ve not tried it recently.)
I’ve been working on a small photo site to share with my family. One of the photos is of the sign in front of a garden for the blind and I want to make the text easily readable outside the photo.
The thing with this photo is, it has a lot of text. And I mean, a LOT. (Go ahead and click the image below, you’ll see what I mean.)
I’m really impressed with the preview tool. Two click and drag operations and I had 95% of the text. All I had to was type the context of. one paragraph, and then do a bit of proofreading (plus remove some hyphens where the text no longer had line breaks.)
Less than an hour of work.
Curious what the sign says? Here’s the text
Welcome to Wynnewood Valley Parks’s Sensory Garden
The Garden’s Origins…
The Rotary Club of Ardmore, in partnership with the Township of Lower Merion; built and dedicated the Wynnewood Valley Park. Garden for the Blind and Children” in 1977.
Ardmore Rotarian and professional landscaper, the late Bill Mulford, spearheaded planning and construction of the multi-tièred garden which introduced Braille plates to identify the individual flowers and shrubs. Prominent among the plantings were 25 cherry trees, a gift from the Rotary Club of Tokyo, Japan in appreciation for a 1973 gift of 300 dogwood saplings from the Ardmore Rotary Club for the Imperial Gardens. The saplings replaced many of the.garden’s 50 dogwood trees which had been damaged during WW II. The 50 dogwood trees, a 1912 gift from the United States of America, were in appreciation for 3000 cherry trees from. Japan which were planted earlier along the Potomac River in Washington Đ.C.
Ardmore Rotarians and the Men’s Garden Club of Delaware Valley maintained the Garden for the Blind until the Garden Club members were unable to continue, In 2005, the Rotary Club of Ardmore, under the leadership of Past President Dr. Douglas Klepfer, decided to restore the Garden, committed funds and began to build a new partnership with Lower Merion Township, Lower Merion Conservancy, the Penn Wynne community and others. A major contribution was presented by The Kistler-Tiffany Foundation to purchase all the plants.
The result is a beautiful new sensory garden and park entrance walkway accessible for all to enjoy. Included in the landscaping are the 12 new “Cherry Trees of Goodwill” donated by the Rotary Club of Tokyo in appreciation for Ardmore Rotary’s gift of 200 pink and white dogwood trees to the Rotary Club of Tokyo in 2004. The trees have been planted in the Imperial Gardens and throughout Japan. The Lower Merion Conservancy has committed its services for garden education and maintenance.
The restored Garden exemplifies the “spirit of the flower that binds the world together” as the Tokyo Rotary Club concluded when accepting the 2004 gift of dogwood trees. Planted in late 2010, the garden celebrated its ribbon-cutting ceremony on May 9, 2011.
The Plants in the Garden…
The Sensory Garden bas 73 species of plants including herbaceous plants and trees and shrubs.
As part of the book tour for his new Book, Class Clown: The Memoirs of a Professional Wiseass, Dave Barry sat for an interview at a Microsoft in-house event. The interviewer was Scott Hanselman, who is also Microsoft’s Vice President of Developer Community (so, a “tech-influencer”).
It’s one of the funniest interviews I’ve heard recently. The spleen story alone is enough to make it worth your time. And now you’ll have to play it too, if for no other reason than to find out about this “spleen story.”
Steve was a little confused by this mention of entering a two-digit code, but it was something I immediately recognized, as did co-host Leo Laporte.
Here’s a clip from this week’s show (episode 1026).
If you didn’t click the video, you’re depriving yourself of the chance to hear Steve Gibson reading an email I sent him.
Hi Steve,
I just listened to episode 1025 in which you read a bit of listener feedback that left you perplexed about Microsoft’s Authenticator app needing you to type in a two-digit number. I use Microsoft’s products in an enterprise environment and thought I might be able to shed some light on this.
What’s going on is that Microsoft offers the option of using a push notification instead of the TOTP (in the enterprises I’m familiar with allow you to use either as a second factor).
The problem with push notifications is, of course, “notification fatigue.” People get used to seeing the notification and just click “Yes, it’s me” without thinking it through. (So if someone figures out your password, and you blindly confirm it…. I’m sure you see where that’s going.)
To counter this, when you log in to a Microsoft system that uses push notifications, they display a two digit number. You then have to enter that number into the pop-up from the authenticator app. That way, it’s much more difficult for an end-user to accidentally confirm a third-party’s login attempt.
I’m running a WordPress instance on a Zimaboard on the home network. Normally, that’s the kind of thing I’d put on the paid hosting service so I can let someone else worry about patching the OS and such, but since family calendars and the like don’t need to be on the public internet, I decided to do this one in-house.
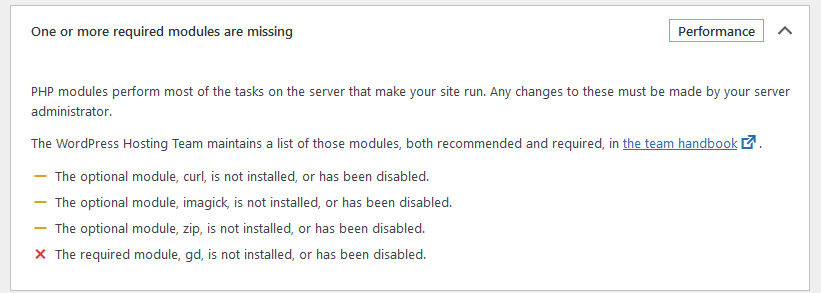
Once I got WordPress up and running, I checked the “Site Health” and along with some old themes that needed to be cleaned up, there was a notice of a critical issue, telling me that “One or more required modules are missing.”
Expanding the dropdown, I saw the list included curl, imagick, zip, and gd. I tried to be thorough when installing PHP, but evidently missed a few. No biggie. Here’s how to fix it.
This is all running on Ubuntu, so the first step is to update the list of available packages. Because you always do that first.
$ sudo apt update -y
Next, install the missing packages. These are php modules, so the package to install is named “php-” and then the module name. (e.g. php-curl).
My machine is running PHP 8.1, so apt determined that the correct packages to install were php8.1-gd, php8.1-imagick, php8.1-curl, and php8.1-zip
Now I know the php-imagick module depends on ImageMagick, so I wanted to make sure that was installed, so after checking the apt command’s help text, I ran apt list -a ImageMagick
$ apt list -a ImageMagick
Listing... Done
imagemagick/jammy-updates,jammy-security,now 8:6.9.11.60+dfsg-1.3ubuntu0.22.04.3 amd64 [installed]
imagemagick/jammy 8:6.9.11.60+dfsg-1.3build2 amd64
Excellent. Everything should be good now right? That’s what I thought, but WordPress disagreed. Returning the Site Health page, the same message appeared, telling me that “One or more required modules are missing.”
I had to scratch my head for a bit on that one. Then I remembered, you don’t just install PHP modules, you also have to tell PHP you want to use them. (For example, Xdebug notoriously causes programs to run more slowly.)
I keep losing track of the file where I have these steps written down. It’s past time to put them someplace where I can find them, and perhaps help a few others as well.
create database SOME_DATABASE;
create user 'SOME_USER'@'localhost' IDENTIFIED BY 'A_STRONG_PASSWORD';
GRANT ALL ON SOME_DATABASE.* TO 'SOME_USER'@'localhost';
The database permissions grant can be fine-tuned a bit, e.g. after installation, remove the DROP, ALTER, and GRANT permissions. (This does, of course, depend on what your plugins are doing, and potentially the needs of a particular major version upgrade.)
Today I learned you can set default output options for the dig command by creating a .digrc file in your home directory.
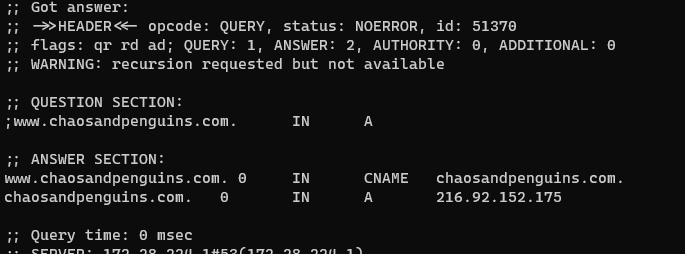
Ordinally, running the command dig www.chaosandpenguins.com, the result is this rather hefty block of text.
$ dig www.chaosandpenguins.com

; <<>> DiG 9.16.1-Ubuntu <<>> www.chaosandpenguins.com
;; global options: +cmd
;; Got answer:
;; ->>HEADER<<- opcode: QUERY, status: NOERROR, id: 40732
;; flags: qr rd ad; QUERY: 1, ANSWER: 2, AUTHORITY: 0, ADDITIONAL: 0
;; WARNING: recursion requested but not available

;; QUESTION SECTION:
;www.chaosandpenguins.com.      IN      A

;; ANSWER SECTION:
www.chaosandpenguins.com. 0     IN      CNAME   chaosandpenguins.com.
chaosandpenguins.com.   0       IN      A       216.92.152.175

;; Query time: 0 msec
;; SERVER: 172.28.224.1#53(172.28.224.1)
;; WHEN: Wed Nov 16 23:13:00 EST 2022
;; MSG SIZE  rcvd: 136
That’s a whole lot of text. So let’s add a couple options. +noall turns off everything. Running dig www.chaosandpenguins.com +noall would literally return nothing at all. To bring back the answer section (which is what I’m interested in most of the time), you add the +answer option.
$ dig www.chaosandpenguins.com +noall +answer
www.chaosandpenguins.com. 0     IN      CNAME   chaosandpenguins.com.
chaosandpenguins.com.   0       IN      A       216.92.152.175
That’s much more compact , but getting it requires some extra typing. And I want that version of the output most of the time, so wouldn’t it be nice if there was to make that the default?
This is where the .digrc file comes in. You create it in your home directory and just put in a single line containing the options you want. So, to make +noall +answer the defaults, I just run this command:
$ echo +noall +answer > ~/.digrc
And now when I run dig www.chaosandpenguins.com without any options, here’s the default output:
$ dig www.chaosandpenguins.com
www.chaosandpenguins.com. 0 IN CNAME chaosandpenguins.com.
chaosandpenguins.com. 0 IN A 216.92.152.175
I’m working on a project where I need to send email from my Raspberry Pi. Installing a full-blown SMTP server would be overkill, I just need something where I can send messages from a bash script.
A brief search led me to a forum post from 2013 which talked about configuring the ssmtp package. That post in turn referenced a step-by-step guide from 2009. Unfortunately, both seem to be out of date, and the latter is for installing it on CentOS?RHEL/RedHat/Fedora. So here’s my attempt at an updated version for the Pi (which should apply to any Debian-based Linux distribution).
Notes
These instructions send via Gmail. If you’re using two-factor authentication (and you really should), you’ll need to set up an application -specific password. Otherwise, you’ll get authentication errors.
The password is stored in plain text. This solution is not suitable for use on a shared system.
I also set the root= setting to my email address. I don’t believe this is necessary, but it does allow me to get notified when something goes wrong with one of my messages. (The way I first found out my configuration was working was a message from a cron job which had some unexpected output.)
Testing
Part of the installation is to set up a symlink so that sendmail becomes an alias for ssmtp. You can use either command.
The ssmtp command doesn’t seem to include command-line options for specifying the subject line or the name of the recipient..
So, here’s a command line you can use. Edit the email address as suits your needs. (The sender name and email address will be embedded by GMail.)
Ignore the word-wrap, this is all one line.
echo -e "Subject: Test Message\nTo: Your Name Here <you@example.com>\nThis message was sent via ssmtp." | ssmtp -t
Alternatively, you can put the recipient’s email address on the command line (the message will then be received as a BCC).
echo -e "Subject: Test Message\nThis message was sent via ssmtp." | ssmtp you@example.com
Troubleshooting
Four files are written to /var/logs
mail.err – contains an entry for each time there’s a problem sending a message.
mail.info – contains an entry for each attempt (successful or failed) at sending a message
This has the potential to be dangerous. ? I was writing an email to a friend and wanted it to be perfectly clear that what I was writing was joke. I find the purely textual emoticons such as the sideways smiley 🙂 are often mistaken for punctuation and their intent lost, so I wanted to use a graphical emoji. We both use GMail, but I don’t care for the “melted lump” characters Google put in there.
On a whim, I did a search for how to type emoji on windows 10 and found a PC World article explaining how to type emoji if you have the Fall Creators Update. My immediate thought was to wonder if it was safe to assume everyone had it yet, and then I realized the article was from 2017! So the feature’s been there for a while and I just didn’t know about it.
So, if you on Windows 10, you can type emoji by pressing the Windows Key, followed by either the period or the semi-colon, and an emoji keyboard will appear. This is much more convenient – and universal – than any per-website or per-application emoji button.
Don’t get me wrong, I’m not a huge fan of emoji, but sometimes you just really want to type ? or ✈ without first visiting emojipedia. ?
(Only bummer on this is GMail replaces the emoji characters with the “melted lump” equivalents.)
By the way, Mac users can do the same by pressing and holding down both the [Control] and [Command] keys and then hitting the space bar.