I’m putting together a small collection of pages to share with family. A CMS would be overkill for this, so I’m creating the HTML by hand (and sometimes I enjoy doing this stuff by hand).
I’ve reached the point where I’m adding text, describing the photos and the memories they bring back. And because I’m using static HTML files, I’m using Visual Studio Code.
The problem is, the GitHub Co-Pilot that’s useful for auto-completing some of the boilerplate, also wants to chime in and offer suggestions for the text of my memories. Not only is this distracting, but some of the text is wildly inaccurate (after all, these are my memories, not the bot’s). So, how do you turn this off?
It turns out this is relatively simple:
Go into the Command Palette (Ctrl-Shift-P or Command-Shift-P)
Did you know the MacOS “Preview” tool can be used to capture the text in a photo of a sign? All you do is click on the first word, and then drag the mouse until all the text is selected. Press Command-C, and then you paste the text into another document. (The Windows Snipping tool has similar functionality, though I’ve not tried it recently.)
I’ve been working on a small photo site to share with my family. One of the photos is of the sign in front of a garden for the blind and I want to make the text easily readable outside the photo.
The thing with this photo is, it has a lot of text. And I mean, a LOT. (Go ahead and click the image below, you’ll see what I mean.)
I’m really impressed with the preview tool. Two click and drag operations and I had 95% of the text. All I had to was type the context of. one paragraph, and then do a bit of proofreading (plus remove some hyphens where the text no longer had line breaks.)
Less than an hour of work.
Curious what the sign says? Here’s the text
Welcome to Wynnewood Valley Parks’s Sensory Garden
The Garden’s Origins…
The Rotary Club of Ardmore, in partnership with the Township of Lower Merion; built and dedicated the Wynnewood Valley Park. Garden for the Blind and Children” in 1977.
Ardmore Rotarian and professional landscaper, the late Bill Mulford, spearheaded planning and construction of the multi-tièred garden which introduced Braille plates to identify the individual flowers and shrubs. Prominent among the plantings were 25 cherry trees, a gift from the Rotary Club of Tokyo, Japan in appreciation for a 1973 gift of 300 dogwood saplings from the Ardmore Rotary Club for the Imperial Gardens. The saplings replaced many of the.garden’s 50 dogwood trees which had been damaged during WW II. The 50 dogwood trees, a 1912 gift from the United States of America, were in appreciation for 3000 cherry trees from. Japan which were planted earlier along the Potomac River in Washington Đ.C.
Ardmore Rotarians and the Men’s Garden Club of Delaware Valley maintained the Garden for the Blind until the Garden Club members were unable to continue, In 2005, the Rotary Club of Ardmore, under the leadership of Past President Dr. Douglas Klepfer, decided to restore the Garden, committed funds and began to build a new partnership with Lower Merion Township, Lower Merion Conservancy, the Penn Wynne community and others. A major contribution was presented by The Kistler-Tiffany Foundation to purchase all the plants.
The result is a beautiful new sensory garden and park entrance walkway accessible for all to enjoy. Included in the landscaping are the 12 new “Cherry Trees of Goodwill” donated by the Rotary Club of Tokyo in appreciation for Ardmore Rotary’s gift of 200 pink and white dogwood trees to the Rotary Club of Tokyo in 2004. The trees have been planted in the Imperial Gardens and throughout Japan. The Lower Merion Conservancy has committed its services for garden education and maintenance.
The restored Garden exemplifies the “spirit of the flower that binds the world together” as the Tokyo Rotary Club concluded when accepting the 2004 gift of dogwood trees. Planted in late 2010, the garden celebrated its ribbon-cutting ceremony on May 9, 2011.
The Plants in the Garden…
The Sensory Garden bas 73 species of plants including herbaceous plants and trees and shrubs.
Today I learned you can set default output options for the dig command by creating a .digrc file in your home directory.
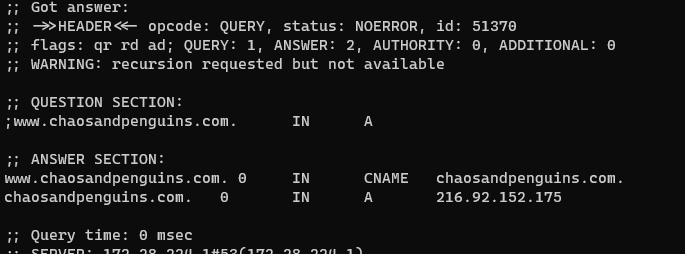
Ordinally, running the command dig www.chaosandpenguins.com, the result is this rather hefty block of text.
$ dig www.chaosandpenguins.com

; <<>> DiG 9.16.1-Ubuntu <<>> www.chaosandpenguins.com
;; global options: +cmd
;; Got answer:
;; ->>HEADER<<- opcode: QUERY, status: NOERROR, id: 40732
;; flags: qr rd ad; QUERY: 1, ANSWER: 2, AUTHORITY: 0, ADDITIONAL: 0
;; WARNING: recursion requested but not available

;; QUESTION SECTION:
;www.chaosandpenguins.com.      IN      A

;; ANSWER SECTION:
www.chaosandpenguins.com. 0     IN      CNAME   chaosandpenguins.com.
chaosandpenguins.com.   0       IN      A       216.92.152.175

;; Query time: 0 msec
;; SERVER: 172.28.224.1#53(172.28.224.1)
;; WHEN: Wed Nov 16 23:13:00 EST 2022
;; MSG SIZE  rcvd: 136
That’s a whole lot of text. So let’s add a couple options. +noall turns off everything. Running dig www.chaosandpenguins.com +noall would literally return nothing at all. To bring back the answer section (which is what I’m interested in most of the time), you add the +answer option.
$ dig www.chaosandpenguins.com +noall +answer
www.chaosandpenguins.com. 0     IN      CNAME   chaosandpenguins.com.
chaosandpenguins.com.   0       IN      A       216.92.152.175
That’s much more compact , but getting it requires some extra typing. And I want that version of the output most of the time, so wouldn’t it be nice if there was to make that the default?
This is where the .digrc file comes in. You create it in your home directory and just put in a single line containing the options you want. So, to make +noall +answer the defaults, I just run this command:
$ echo +noall +answer > ~/.digrc
And now when I run dig www.chaosandpenguins.com without any options, here’s the default output:
$ dig www.chaosandpenguins.com
www.chaosandpenguins.com. 0 IN CNAME chaosandpenguins.com.
chaosandpenguins.com. 0 IN A 216.92.152.175
I’m working on a project where I need to send email from my Raspberry Pi. Installing a full-blown SMTP server would be overkill, I just need something where I can send messages from a bash script.
A brief search led me to a forum post from 2013 which talked about configuring the ssmtp package. That post in turn referenced a step-by-step guide from 2009. Unfortunately, both seem to be out of date, and the latter is for installing it on CentOS?RHEL/RedHat/Fedora. So here’s my attempt at an updated version for the Pi (which should apply to any Debian-based Linux distribution).
Notes
These instructions send via Gmail. If you’re using two-factor authentication (and you really should), you’ll need to set up an application -specific password. Otherwise, you’ll get authentication errors.
The password is stored in plain text. This solution is not suitable for use on a shared system.
I also set the root= setting to my email address. I don’t believe this is necessary, but it does allow me to get notified when something goes wrong with one of my messages. (The way I first found out my configuration was working was a message from a cron job which had some unexpected output.)
Testing
Part of the installation is to set up a symlink so that sendmail becomes an alias for ssmtp. You can use either command.
The ssmtp command doesn’t seem to include command-line options for specifying the subject line or the name of the recipient..
So, here’s a command line you can use. Edit the email address as suits your needs. (The sender name and email address will be embedded by GMail.)
Ignore the word-wrap, this is all one line.
echo -e "Subject: Test Message\nTo: Your Name Here <you@example.com>\nThis message was sent via ssmtp." | ssmtp -t
Alternatively, you can put the recipient’s email address on the command line (the message will then be received as a BCC).
echo -e "Subject: Test Message\nThis message was sent via ssmtp." | ssmtp you@example.com
Troubleshooting
Four files are written to /var/logs
mail.err – contains an entry for each time there’s a problem sending a message.
mail.info – contains an entry for each attempt (successful or failed) at sending a message
Don’t get me wrong, Scott can be entertaining too, but the git config linked from that tweet is full of things I didn’t even know you could configure! (Six months in, I’m still finding entirely new realms within git that I didn’t realize I didn’t know about!)
Seeing the config sections for the merge and diff tools, I also verified that yes, the bc merge/diff tool referenced in the git documentation really is (or at least, can be) Beyond Compare. I’ve been using TortiseGit for my Git GUI needs, but I also like Beyond Compare. (The default vi-based diff tool is just painful.)
I’ve been working with Docker the past few months and all-in-all, I’ve been very pleased with the quality of the documentation. But, as with any other tool, there are always a few tricks to pick up, particularly when trying to script things out for an automated build or deployment. I’ve listed some of the more useful ones below and will update this post as I learn new ones.
Note: These are mainly oriented around running Docker in a Linux environment, as that’s where I’m currently using it.
How do I stop typing sudo all the time?
Docker runs as root, so when you’re working with an out-of-the-box installation, the docker command must be preceded by sudo. Since it may not be desirable for all Docker users to be able to execute commands as root, the installation creates a docker group. Members of the group may execute docker commands without elevated privileges.
To add users to the group, execute the command: sudo usermod -aG docker <username>
How do I remove all stopped containers?
When a container is stopped, it remains loaded. You can remove it by issuing the command docker rm container_name, but that can be a hassle if you have a large number of containers loaded and they all have random names (a frequent occurrence when you’re first learning Docker).
You can remove all stopped containers by executing the command: docker rm $(docker ps --quiet -a --filter status=exited)
(The –filter option prevents errors from attempting to remove containers which are currently running.)
You can also cause your containers to remove themselves automatically by including the –rm option on the docker run command line.
How do I know if a container is running?
To determine if a named container (e.g. “clever_leakey”) is currently running
if $containerID is non-null, the named container is running. If it’s null, then the container is no longer running.
Do note however that there are other non-running states, e.g. paused, which will also return a null containerID for this test. As an alternative, to find only the containers which are stopped, use status=exited.
If the docker run command includes the –rm option, the container will be removed from memory.
I reinstalled Evernote a week or so back and every time I fired it up, a background window would also open containing the message “Could not add tray icon, error: An attempt was made to reference a token that does not exist.” Every time this happened, I’d dismiss the message and move on with what I was working on.
This routine got old pretty quickly so I did what any other geek would do and Googled for the message. Apparently the message has been around for a while, with the suggested fix being to reinstall Evernote. So I uninstalled Evernote, waited a few minutes, and then reinstalled it. Then I went back into the application and a background window opened with the same message.
This time, after closing both the pop-up and the main application window, I took a look in the system tray and discovered that Evernote’s “running in the background” icon was also missing. I also realized I’d never been prompted to run the installer as an administrator.
I run my computer differently than most people – the user account where I do my day-to-day work has reduced privileges. There’s a separate login for anything requiring elevated privileges, such as installing software. Most installers will either prompt you to either login as an administrator, or else they’ll install to an alternate location (generally somewhere in the %APPDATA% folder). I didn’t dig too deeply, but my best guess is that Evernote was doing the latter, but the system tray icon requires something to be installed with higher privileges.
In the end, I uninstalled Evernote again and this time made sure to re-install with admin privileges.
One of my co-workers retired back in the Spring, but still stops by to visit on occasion. He understood the importance of software source control, but had a few struggles with it. As he was leaving after his most recent visit, we had this brief exchange
Co-Worker: You know, I left on March 15 and haven’t had any tree conflicts since then.
Me: That’s great! No branches falling in the back yard?
Co-Worker: Well… at least, they weren’t trying to merge.
It’s difficult to get much geekier than when you’re making source control puns.
So here’s a strange one that had me baffled for a bit – the chmod command is pretty much a null operation from the Git Bash prompt (MingW64). This initially showed up on a script for launching a Docker container, but as nearly as I can tell, it happens for any shell script.
So, we have a simple script that prints out “Hello World!”.
Simple enough. Now the thing is, I want to make this script executable. Now this particular Bash implementation will let me run ./foo and it’ll execute, but my real use case (running a Docker container) is going to have a somewhat longer name. Just as a matter of convenience, I’d like to to type just the first few characters, press tab, and have the filename expanded. And besides, your executable files should always be marked as executable.
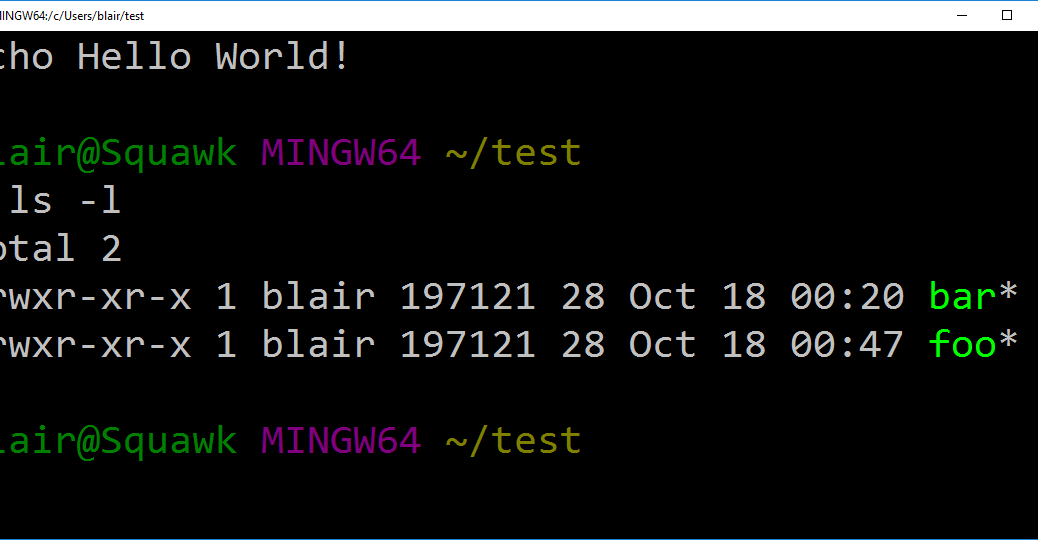
blair@SquawkMINGW64~/test$ ls -l
total 2
-rwxr-xr-x 1 blair 197121 28 Oct 18 00:20bar*
-rw-r--r-- 1 blair 197121 18 Oct 18 00:10 fooblair@SquawkMINGW64~/test$
OK, this is an easy fix, I just need to run chmod and set the execute bit to on, right?
blair@SquawkMINGW64~/test$ ls -l
total 2
-rwxr-xr-x 1 blair 197121 28 Oct 18 00:20bar*
-rw-r--r-- 1 blair 197121 18 Oct 18 00:10 fooblair@SquawkMINGW64~/test$ chmod 744 fooblair@SquawkMINGW64~/test$ ls -l
total 2
-rwxr-xr-x 1 blair 197121 28 Oct 18 00:20bar*
-rw-r--r-- 1 blair 197121 18 Oct 18 00:10 foo
The execute bit didn’t change. Maybe I need to use the u+x syntax instead?
$ chmod u+x fooblair@SquawkMINGW64~/test$ ls -l
total 2
-rwxr-xr-x 1 blair 197121 28 Oct 18 00:20bar*
-rw-r--r-- 1 blair 197121 18 Oct 18 00:10 foo
Still no luck. So why is bar marked as executable? What’s the difference between these two scripts? The answer turns out to be one line of code:
Do you see that first line, where it says “#!/bin/sh”. That’s how Bash knows what interpreter to pass the script to. It also turns out, in this particular implementation, that’s how Bash knows the file contains an executable script instead of just text.
So we modify foo, and get this result:
blair@SquawkMINGW64~/test$ cat foo
#!/bin/sh
echo Hello World!blair@SquawkMINGW64 ~/test$ ls -l
total 2
-rwxr-xr-x 1 blair 197121 28 Oct 18 00:20bar*-rwxr--r-- 1 blair 197121 18 Oct 18 00:10 foo*
I have two GitHub accounts: UserA and UserB. Over time I’ve been switching to working with UserB, but the switchover was a bit difficult.
I created a test repository on GitHub at https://github.com/UserB/test
On the local system, from the command prompt
cd \git

git clone https://UserB@github.com/UserB/test

cd test

# make some changes to README.md, add a new foo.txt

git add *

git commit -m "Banana!" # In real life, you'll probably want a more useful comment.
And that’s where the train went off the rails…
C:\git\test>git push

remote: Permission to UserB/test.git denied to UserA.

fatal: unable to access 'https://UserB@github.com/UserB/test/': The requested URL returned error: 403
So git’s saying that even though I expressly got this as UserB, it still thinks I’m UserA
Google came back with lots of stuff about making sure you have the right SSH key (apparently the cool kids do everything over SSH).
A few search results make reference to the Windows Credential Manager. Apparently the Windows version of Git hooks into that somehow. What’s the Windows Credential Manager? Well, from the name, it sounds like something that might be used for storing userids and passwords.
OK, so how do I invoke it? Dunno. Let’s try the search box on the START menu. Aha! Two entries. One for “Credential Manager” and one for “Manage Windows Credentials.”
So let’s try the first one. Hey! This looks promising:
About halfway down the list, there’s one labeled “git:https://github.com” Let’s expand that.
Oh, looky there! Username and password.
Now what I did was to remove the entry and then push again. I was prompted to enter a userid and password. I still had to type the password at the command prompt, but IT STUCK.
C:\git\test>git push

Counting objects: 3, done.

Delta compression using up to 8 threads.

Compressing objects: 100% (2/2), done.

Writing objects: 100% (3/3), 304 bytes | 0 bytes/s, done.

Total 3 (delta 0), reused 0 (delta 0)

To https://github.com/UserB/test

5e74c47..cf2ca13 master -> master
I probably could have clicked “Edit” and changed the userid and password, and just kept going, but I didn’t notice the “Edit” right away.
It looks as though you might actually be able to have multiple entries for git:https://github.com, but I haven’t tried that yet.