Tag Archives: Tech

Docker Tips

I’ve been working with Docker the past few months and all-in-all, I’ve been very pleased with the quality of the documentation. But, as with any other tool, there are always a few tricks to pick up, particularly when trying to script things out for an automated build or deployment. I’ve listed some of the more useful ones below and will update this post as I learn new ones.

Note: These are mainly oriented around running Docker in a Linux environment, as that’s where I’m currently using it.

How do I stop typing sudo all the time?

Docker runs as root, so when you’re working with an out-of-the-box installation, the docker command must be preceded by sudo. Since it may not be desirable for all Docker users to be able to execute commands as root, the installation creates a docker group. Members of the group may execute docker commands without elevated privileges.

To add users to the group, execute the command:
sudo usermod -aG docker <username>

How do I remove all stopped containers?

When a container is stopped, it remains loaded. You can remove it by issuing the command docker rm container_name, but that can be a hassle if you have a large number of containers loaded and they all have random names (a frequent occurrence when you’re first learning Docker).

You can remove all stopped containers by executing the command:
docker rm $(docker ps --quiet -a --filter status=exited)

(The –filter option prevents errors from attempting to remove containers which are currently running.)

You can also cause your containers to remove themselves automatically by including the –rm option on the docker run command line.

How do I know if a container is running?

To determine if a named container (e.g. “clever_leakey”) is currently running

containerID=$(docker ps --quiet --filter status=running --filter name=clever_leakey)

if $containerID is non-null, the named container is running. If it’s null, then the container is no longer running.

Do note however that there are other non-running states, e.g. paused, which will also return a null containerID for this test. As an alternative, to find only the containers which are stopped, use status=exited.

If the docker run command includes the –rm option, the container will be removed from memory.

(Image via openclipart under Creative Commans CC0 1.0 Universal)

Fixing Evernote’s “Could not add tray icon, error: An attempt was made to reference a token that does not exist.” message

I reinstalled Evernote a week or so back and every time I fired it up, a background window would also open containing the message “Could not add tray icon, error: An attempt was made to reference a token that does not exist.” Every time this happened, I’d dismiss the message and move on with what I was working on.

This routine got old pretty quickly so I did what any other geek would do and Googled for the message. Apparently the message has been around for a while, with the suggested fix being to reinstall Evernote. So I uninstalled Evernote, waited a few minutes, and then reinstalled it. Then I went back into the application and a background window opened with the same message.

This time, after closing both the pop-up and the main application window, I took a look in the system tray and discovered that Evernote’s “running in the background” icon was also missing. I also realized I’d never been prompted to run the installer as an administrator.

I run my computer differently than most people – the user account where I do my day-to-day work has reduced privileges. There’s a separate login for anything requiring elevated privileges, such as installing software. Most installers will either prompt you to either login as an administrator, or else they’ll install to an alternate location (generally somewhere in the %APPDATA% folder). I didn’t dig too deeply, but my best guess is that Evernote was doing the latter, but the system tray icon requires something to be installed with higher privileges.

In the end, I uninstalled Evernote again and this time made sure to re-install with admin privileges.

I haven’t seen the error message since.

(Public domain image, via pixabay)

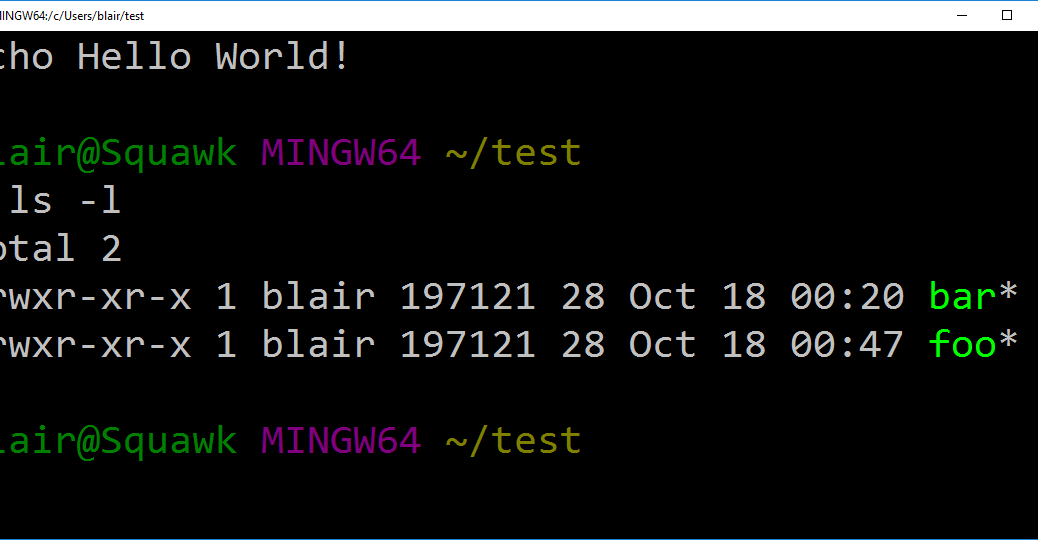
Problem: chmod is ignored in the Git Bash prompt

So here’s a strange one that had me baffled for a bit – the chmod command is pretty much a null operation from the Git Bash prompt (MingW64). This initially showed up on a script for launching a Docker container, but as nearly as I can tell, it happens for any shell script.

So, we have a simple script that prints out “Hello World!”.

blair@Squawk MINGW64 ~/test
$ cat foo
echo Hello World!

Simple enough. Now the thing is, I want to make this script executable. Now this particular Bash implementation will let me run ./foo and it’ll execute, but my real use case (running a Docker container) is going to have a somewhat longer name. Just as a matter of convenience, I’d like to to type just the first few characters, press tab, and have the filename expanded. And besides, your executable files should always be marked as executable.

blair@Squawk MINGW64 ~/test
$ ls -l
total 2
-rwxr-xr-x 1 blair 197121 28 Oct 18 00:20 bar*
-rw-r--r-- 1 blair 197121 18 Oct 18 00:10 foo

blair@Squawk MINGW64 ~/test
$

OK, this is an easy fix, I just need to run chmod and set the execute bit to on, right?

blair@Squawk MINGW64 ~/test
$ ls -l
total 2
-rwxr-xr-x 1 blair 197121 28 Oct 18 00:20 bar*
-rw-r--r-- 1 blair 197121 18 Oct 18 00:10 foo

blair@Squawk MINGW64 ~/test
$ chmod 744 foo
blair@Squawk MINGW64 ~/test
$ ls -l
total 2
-rwxr-xr-x 1 blair 197121 28 Oct 18 00:20 bar*
-rw-r--r-- 1 blair 197121 18 Oct 18 00:10 foo

The execute bit didn’t change. Maybe I need to use the u+x syntax instead?

$ chmod u+x foo
blair@Squawk MINGW64 ~/test
$ ls -l
total 2
-rwxr-xr-x 1 blair 197121 28 Oct 18 00:20 bar*
-rw-r--r-- 1 blair 197121 18 Oct 18 00:10 foo

Still no luck. So why is bar marked as executable? What’s the difference between these two scripts? The answer turns out to be one line of code:

blair@Squawk MINGW64 ~/test
$ chmod u+x foo
blair@Squawk MINGW64 ~/test
$ cat bar
#!/bin/sh
echo Hello World!

Do you see that first line, where it says “#!/bin/sh”. That’s how Bash knows what interpreter to pass the script to. It also turns out, in this particular implementation, that’s how Bash knows the file contains an executable script instead of just text.

So we modify foo, and get this result:

blair@Squawk MINGW64 ~/test$ cat foo
#!/bin/sh
echo Hello World!
blair@Squawk MINGW64 ~/test
$ ls -l
total 2
-rwxr-xr-x 1 blair 197121 28 Oct 18 00:20 bar*
-rwxr--r-- 1 blair 197121 18 Oct 18 00:10 foo*

(Image credit: Screenshot by ThatBlairGuy)

git error: Permission to user-B/repo.git denied to user-A

I have two GitHub accounts: UserA and UserB. Over time I’ve been switching to working with UserB, but the switchover was a bit difficult.

I created a test repository on GitHub at https://github.com/UserB/test

On the local system, from the command prompt

cd \git
git clone https://UserB@github.com/UserB/test
cd test
# make some changes to README.md, add a new foo.txt
git add *
git commit -m "Banana!" # In real life, you'll probably want a more useful comment.

And that’s where the train went off the rails…

C:\git\test>git push
remote: Permission to UserB/test.git denied to UserA.
fatal: unable to access 'https://UserB@github.com/UserB/test/': The requested URL returned error: 403

So git’s saying that even though I expressly got this as UserB, it still thinks I’m UserA

Google came back with lots of stuff about making sure you have the right SSH key (apparently the cool kids do everything over SSH).

A few search results make reference to the Windows Credential Manager. Apparently the Windows version of Git hooks into that somehow. What’s the Windows Credential Manager? Well, from the name, it sounds like something that might be used for storing userids and passwords.

OK, so how do I invoke it? Dunno. Let’s try the search box on the START menu. Aha! Two entries. One for “Credential Manager” and one for “Manage Windows Credentials.”

So let’s try the first one. Hey! This looks promising:

About halfway down the list, there’s one labeled “git:https://github.com” Let’s expand that.

Oh, looky there! Username and password.

Now what I did was to remove the entry and then push again. I was prompted to enter a userid and password. I still had to type the password at the command prompt, but IT STUCK.

C:\git\test>git push
Counting objects: 3, done.
Delta compression using up to 8 threads.
Compressing objects: 100% (2/2), done.
Writing objects: 100% (3/3), 304 bytes | 0 bytes/s, done.
Total 3 (delta 0), reused 0 (delta 0)
To https://github.com/UserB/test
5e74c47..cf2ca13 master -> master

I probably could have clicked “Edit” and changed the userid and password, and just kept going, but I didn’t notice the “Edit” right away.

It looks as though you might actually be able to have multiple entries for git:https://github.com, but I haven’t tried that yet.

(Public domain photo from PublicDomainPictures.net)

What is an SDK vs. a JDK vs. a JRE?

The Content Management System we use at the office is written in Java, so on the development systems, we need to be careful to match the JDK version to the JRE version used by the CMS vendor. Periodically someone new will join the team, and they end up wondering what a JDK is and how is that different from a JRE?

So let’s break this down. Generally speaking, an SDK or Software Development Kit. Basically, it’s the set of compilers, debuggers, and other tools used for creating software on a given platform.

That’s basically what the JDK is.  The Java Development Kit contains compilers, debuggers and other tools for creating Java applications.

While a software (or Java) development kit allows you to create software, some software platforms also require a runtime environment. The JRE, or Java Runtime Environment is the support software that allows a Java application to execute.

(Photo from Pexels.com, used under Creative Commons Zero.)

Dropbox

So, I woke up this morning to an email from Troy Hunt, or rather, a message from his Have I Been Pwned? service. It seems that my account was one of the 68,648,009 compromised in the Dropbox breach.

From the sound of things, there’s some mixed news. The bad news is, at the time of the breach, four years ago, many passwords were still being stored as SHA-1 (MD5) hashes. The good news is that they appear to have been salted hashes and the hash values weren’t included in the breach.

Dropbox did send out an alert a few days ago saying that they had reset passwords for anyone who hadn’t updated their password in the past four years (guilty!). The email said it was done as a precaution, but didn’t go into detail about what it was a precaution again. To find that out, you had to click through and read a blog post.

I’m probably OK. My password probably wasn’t as secure as it might have been, but thankfully, the lack of salt values for the SHA1 passwords should make them quite difficult to break. And perhaps most importantly, I’ve never used that same password anywhere else.

(But yes, I changed my password to something a bit more secure. It’s now 40 random characters generated by KeePass.)

Some important takeaways:

  1. Change your Dropbox password.
  2. Don’t use the same password in more than one place.
    • Consider a password manager. I’m mostly happy with KeePass, but also hear good things about LastPass.
  3. Consider turning on two-factor authentication.
  4. Consider also signing up with Have I Been Pwned?
  5. Why are you still reading this? Go change your Dropbox password!

(Photo from Pexels, free for non-commercial use.)

Three Minutes of Fame

Today I was internet-famous for slightly more than three minutes; just long enough for Richard Cambell and Carl Franklin to read and reply to a comment on an episode of the .Net Rocks Podcast.

Back in January, I left a comment on their website, regarding StartSSL and Let’s Encrypt, two providers of SSL certificates they’d mentioned during the show. Today, show 1287 came out, covering the topic of “InfoSec for Developers” and they used my comment (right about the 5:40 mark) as the segue to the conversation with their guest, security professional Kim Carter. (Interestingly, he turns out to be using security certificates from one of the sources I’d commented on.)

So if you don’t know that’s all about, an “SSL certificate” is one of the things you need in order to setup a secure website using HTTPS. This is part of what triggers the lock icon to appear when you’re viewing a secure web site. (You do look for that when buying things online, right?)

Richard made a valid point that a paid-for certificate really doesn’t get a whole lot more validation than what the free ones get, so if you’re able to take advantage of the free ones, there’s not really a lot of incentive not to. (it does leave the question of what extra value you get with a paid SSL certificate.)

The self-signed certificates mentioned in my question don’t have anyone vouching for their authenticity, though it’s not clear that the free or even the paid for certificates have anyone vouching for them either. There is another kind of certificate though, the “Extended Validation” certificate (which is what your bank should be using) which does involve some in-depth checking of identity.

One thing that does distinguish third-party (i.e. “real”) certificates from the self-signed ones is that if something goes wrong (e.g. the private key is stolen), a third-party certificate can be revoked. Since the webmaster is the only one vouching for a self-signed certificate, there’s no way to tell whether the person saying the certificate is valid is who they say they are. The third party certificates come from a source which has been validated, and there’s a secure chain of connections for verifying that the certificate can be trusted.

Raspberry Pi Beginners Guide

Another entry from the land of “So I can find it later….”

Setting up the Raspberry Pi set was easy enough, and installing Chromium (the open-source version of Chrome) only took a single command (apt-get install chromium). When I was using it to post “Hello World” on Facebook, I discovered that the @ and ” keys were reversed (the physical keys were in their usual locations, but their behaviors were backwards). OK, the keyboard mapping isn’t set for the US. (The Pi and the drive image I’m using are both from the UK.)

I was pretty sure I could fix it via the configuration program that runs when you boot the first time, but there were two problems: (1) the configuration program only run automatically on the first boot and (2) I couldn’t remember the command.

Searching for raspberry pi configuration program led to the link RPi Beginners which looks to chock-full of useful information if (like me) you’re just getting started with Linux and/or the Pi. (For example: Backup your SD card.)

By the way, the configuration program is raspi-config; you’ll need to run it as sudo raspi-config.

Installing Ubuntu without pae

From the land of “things I might want to refer to later….”

My old Dell Inspiron works fine except for a missing ‘R’ key. Windows XP is showing more signs of age than the notebook, so time to put another OS on it.

I’ve been using Ubuntu in such situations, but my attempts at installing both 12.04> and Lubuntu (lightweight Ubuntu) have both ended with a message about the hardware not supporting the required pae extensions.

Physical Address Extension (aka pae) is an Intel technology which allows a 32-bit operating system to access more than 4 GB of RAM. (A quick read suggests it essentially hands each application a 4 GB chunk of memory, similar to how programs on the 80286 and earlier chips were able to address more than 64 KB at a time by combining a 16-bit memory address with a 16-bit segment address — and by revealing that I know about this, I’ve probably dated myself quite handily.)

Another quick search on Google turned up a relevant pair of AskUbuntu Questions describing how to install a non-PAE version.

In a nutshell:

  • Download the non-pae netboot image mini.iso. This is a bare-bones installer which downloads the selected packages during the installation process. (Obviously, this requires a broadband connection.)
  • Burn the image onto a CD* and boot the computer from that.
  • Accept the default values for most of the prompts. You’ll need to supply a userid and password. My experience is that it’s faster to select the keyboard layout from a list then to go through the prompts for “detection.” (Faster for a standard US keyboard anyhow; your mileage may vary.)
  • At the final screen, when prompted for packages to install, be certain to select a desktop (e.g. Ubuntu Desktop) unless you plan to do everything from the command line.

* The Inspiron’s CD drive is getting old and unreliable, using UNetbootin to make a bootable thumb drive worked perfectly.

DRM and Monopolies

I miss Rob Pegaroraro’s contributions to the Washington Post’s technology coverage. Instead of the Apple Rumor du jour that passes for Tech Journalism in most places, he digs into policy angles.

He makes some interesting points in his story “Overlooked E-Book Chapter: DRM Makes Monopolies.” Notably, the fact that once someone buys an e-reader (e.g. a Nook or Kindle), they’re not likely to buy e-books from competing vendors. Why not? Because the Digital Rights Management (or rather, Digital Rights Restrictions) prevent you from reading a book from vendor A on vendor B’s hardware.

He does overlook two loopholes though. First off, you can buy two e-readers. If you have lots of money. (In which case, please share some with me!) Or you can buy a tablet computer (iPad or Android) and download the free Kindle and Nook e-reader apps. You still can’t read the books from one store in the competing stores’ app, but at least you only have to buy one piece of hardware.

But it’s still not convenient. And, as Pegaroraro points out, your rights to the book are sharply limited. With a physical book, once you’ve read it, you can put it on a shelf, sell it or give it away. With an e-book, it’s yours forever.