Category Archives: tech

Articles relating to a variety of technical themes. Dividing by Zero is not defined, so this fits in as well as anything else does.

RDP connection to Linux

Going down one rabbit hole or another last night, I somewhat randomly found an article detailing how to install and access a graphical desktop UI on the Windows Subsystem for Linux.

The gist of it is

  1. Update your packages.
  2. Install the xfce4 package and optionally, xfce4-goodies (one imagines this would work for other desktops as well)
  3. Install xrdp
  4. Change the port (the default RDP port is used for connecting to the shell)
  5. Start xrdp
  6. Launch an RDP to localhost, using the new port number.

It’s a neat trick, but I’m not sure how much use I have for it. Most of what I do with WSL (e.g. running various Linux utilities) is command-line oriented. A GUI just adds extra steps. Plus, because of the way WSL works, you have to restart xrdp any time you restart Windows. That’s already a nuisance with XAMPP.

But that one step, installing xrdp. I might have a use case for that. I keep a couple Linux VMs around for things where I do want a GUI, and it’s also a nuisance having to launch the Hyper-V manager in order to connect. If I could just leave the VM running in the background and RDP to it as needed…. that would be helpful.
FR, Gridview, and puns

I follow @Cassidoo on Twitter and spotted this thread she started.

I know a few folks who think puns are for children and not groan adults, but me, I’ve always enjoyed a good play on words. She continues on for a few more tweets, all playing off CSS units of measurement, and other people chimed in with their own.

As I said, I like a good play on words, but one thing was bothering me, “What’s this ‘fr’ thing?” One Google search later, I now know it’s a unit of measure meaning, to use an automatically calculated fraction of the space in a container. It’s used in grids and flexboxes and solves some problems where you accidentally use more than 100% of the available space.

You can read about it in the spec, but I found this introduction to the fr CSS unit to be quite helpful.

I do believe, I may have a few dozen uses for this. ?

Home Assistant and TP-Link

Last week, I spotted this tweet from the official Home-Assistant account.

In short, what’s happened is that TP-Link issued a firmware update that turns off the ability to control their smart plugs (and, one assumes, smart switches) from a device on the local network (e.g. Home Assistant), leaving the cloud-based API, and their official KASA app, as the only way to control the devices.

I use TP-Link smart plugs myself. Currently to automate some lamps in the living room, but I’ll also be using them soon to automate the Christmas lights. (Sure, I could use a lamp timer, but I want the lights to go on right at sunset, not “sometime near sunset.” ?) For me, key parts of the value proposition were (a) It worked with Home Assistant (b) It didn’t require using someone else’s cloud (i.e. my usage patterns remain private).

Digging into it a bit… Turns out that there really is a legit security flaw with these devices. I haven’t seen any official details from TP-Link, but I found other reports of problems (Which?, October 2020; Fernando Gont, March 2017) involving weak encryption and the ability for other people to control the device.

So, it’s a legitimate concern. Ideally, the fix would be a locally accessible API with authentication. Turning off local access altogether is rather “ham fisted.”

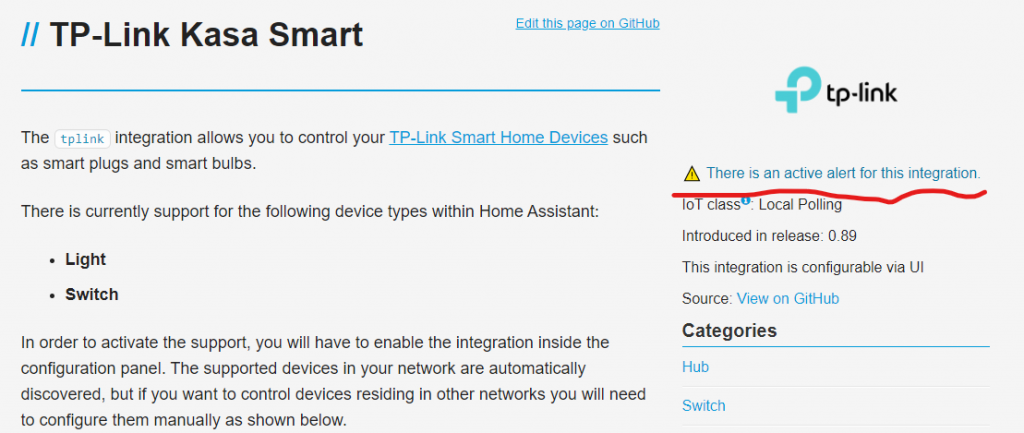
Home Assistant has issued an alert that the TP-Link integration is “broken” with a link to a user-community discussion, though the alert isn’t really as obvious as one might hope….

Now that I know about the problem, I’ll have to weigh the risks of leaving the firmware out of date against losing my automations. I like the TP-Link plugs, they’ve been pretty reliable over the past several years, and the Home Assistant integration is about as simple as they come (you add a plug to your network, Home Assistant adds it to the list of devices…. easy peasy).

Ultimately, this comes down to the risks of using a “black box” product, where there is no official support for Home Assistant. Fortunately, there is a bit of good news in this. TP-Link seems to value the Home Assistant community and in response to the uproar is working on a fix to restore the local-control functionality.

The question is, do I trust them not to break it again?

Sending mail from a script on a Raspberry Pi

I’m working on a project where I need to send email from my Raspberry Pi. Installing a full-blown SMTP server would be overkill, I just need something where I can send messages from a bash script.

A brief search led me to a forum post from 2013 which talked about configuring the ssmtp package. That post in turn referenced a step-by-step guide from 2009. Unfortunately, both seem to be out of date, and the latter is for installing it on CentOS?RHEL/RedHat/Fedora. So here’s my attempt at an updated version for the Pi (which should apply to any Debian-based Linux distribution).

Notes

  • These instructions send via Gmail. If you’re using two-factor authentication (and you really should), you’ll need to set up an application -specific password. Otherwise, you’ll get authentication errors.
  • The password is stored in plain text. This solution is not suitable for use on a shared system.

The Steps

sudo apt update -y && sudo apt upgrade -y
sudo apt install -y ssmtp
sudo vi /etc/ssmtp/ssmtp.conf

Make these changes to the ssmtp.conf file

mailhub=smtp.gmail.com:463
FromLineOverride=YES
AuthUser=Your_GMail_Address
AuthPass=Your_GMail_Password
UseTLS=YES

I also set the root= setting to my email address. I don’t believe this is necessary, but it does allow me to get notified when something goes wrong with one of my messages. (The way I first found out my configuration was working was a message from a cron job which had some unexpected output.)

Testing

Part of the installation is to set up a symlink so that sendmail becomes an alias for ssmtp. You can use either command.

The ssmtp command doesn’t seem to include command-line options for specifying the subject line or the name of the recipient..

So, here’s a command line you can use. Edit the email address as suits your needs. (The sender name and email address will be embedded by GMail.)

Ignore the word-wrap, this is all one line.

echo -e "Subject: Test Message\nTo: Your Name Here <you@example.com>\nThis message was sent via ssmtp." | ssmtp -t

Alternatively, you can put the recipient’s email address on the command line (the message will then be received as a BCC).

echo -e "Subject: Test Message\nThis message was sent via ssmtp." | ssmtp you@example.com

Troubleshooting

Four files are written to /var/logs

  • mail.err – contains an entry for each time there’s a problem sending a message.
  • mail.info – contains an entry for each attempt (successful or failed) at sending a message
  • mail.log – duplicates mail.info.
  • mail.warn – duplicates mail.err.

(Image via Pixabay user Deans_icons used under Pixabay License.)

Creating a Time Lapse Video with ffmpeg

This is one of those posts I’m writing for myself as much as for anyone else. ?

Someone from the local Buy Nothing group had some older webcams they were giving away and I was able to get one. My long term goal is to eventually set up a camera with a Raspberry Pi and do some motion-activated photography of whatever wildlife comes through our backyard. (Previous attempts have revealed deer, a fox, and various stray cats.)

For now though, I put it in my office window and set up the Windows 10 camera app to take photos of the front-yard flower bed once every ten seconds. After about 90 minutes, I had 504 photos. Now, what to do with them?

Stepping through them quickly in the image viewer made a day of gentle breezes seem quite windy. So I decided to turn them into a time-lapse.

The VLC player is my go-to for playing videos, and I’ve had some luck using to convert between formats as well, so I wondered if I might be able to use that. I found some tips for using it to create “slideshows”, but nothing for saving the slideshow as a video file.

But I did notice that a lot of the comments mentioned using ffmpeg.

That’s a Linux program, so I opened a I opened a Windows Subsystem for Linux prompt and installed it.

$ sudo apt update && sudo apt install ffmpeg

The ffmpeg program has a rich set of command line options to learn, but for now, I just wanted to convert my photos to a video. After a few false starts, I found some helpful tips in this Stack Overflow answer and tried it out

$ ffmpeg -framerate 1 -pattern_type glob -i '*.jpg'   -c:v libx264 -r 30 -pix_fmt yuv420p out.mp4

The first pass, with one frame per second, wasn’t quite what I was looking for. It was a “slideshow as video” but too slow paced for what was really 504 nearly identical images.

The next pass was 10 frames per second, followed by 30. I finally settled for 60 frames per second:

$ ffmpeg -framerate 60 -pattern_type glob -i '*.jpg'   -c:v libx264 -r 30 -pix_fmt yuv420p out-60fps.mp4

Pi-Hole

I’ve been experimenting with a Pi-Hole for the past two weeks. This evening I reconfigured the home network so all of our devices will default to using the Pi-Hole for IP address assignment and DNS.

Next, I set up a group so my wife’s work computer will be exempted from DNS filtering. A web-based application shouldn’t break because of a blocked tracker, but I don’t want to troubleshoot any collateral damage.

Finally, I reconfigured my phone and desktop to get their IP and DNS information dynamically instead of the static settings they’d been using while I evaluated the set up.

If all goes according to plan, I just sit back and relax and no longer have to deal with ads for an item I bought last week following me across the web for the next month.

(Public domain image from US National Aeronautics and Space Administration)