All posts by ThatBlairGuy

That Blair Guy has been working in software for longer than he cares to admit. These days he works throughout the software stack from the web UI down to SQL (and sometimes no-SQL), generally on the .Net framework, with frequent excursions to NodeJS, Linux, and PHP.

Generating Images from HTML

Editing images is hard. Moving things to the right location, adding other elements, going back to the first one and readjusting the location or size. And if you want to create multiple images with just a slightly different bit of text, or a different subject in the foreground…..

I’ve known people who can create masterpieces of art with PhotoShop and the like, but I’ve never developed the knack.

A while back, it occurred to me that I could do all kinds of fancy “this-goes-in-front-of-that” and rearranging things in a web page. Then I could just take a screenshot, do a little cropping and resizing (the secret to some of my best photos) and voilà, exactly the kind of image I wanted! And if I needed to make several such photos, well, web pages are just plain text and very easy to edit.

That’s great for a small number of images, but if you want to make a bunch of images (say, social media previews for 40 biographies), that would get tedious quickly.

The best way to deal with tedious tasks is automation.

So I created an automated HTML to Image Generator (it really needs a better name).

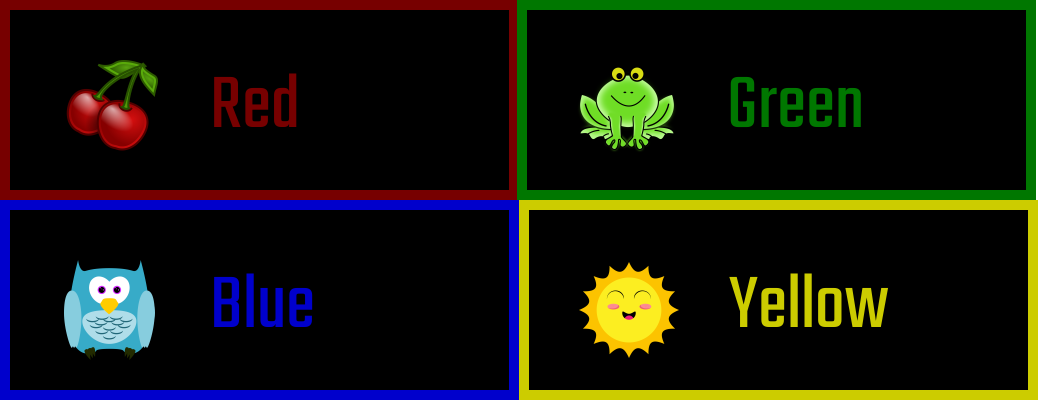
The idea behind it is you start off with a simple web page like this one:

<body>
	<div class="container">
		<img src="image/frog.png">
		<p class="name">Green</p>
	</div>
</body>

which creates a page looking like this:

Replace a few elements in the HTML with placeholders

<body>
	<div class="container">
		<img src="{{image}}">
		<p class="name">{{name}}</p>
	</div>
</body>

and then create a set of data files containing other values for those those placeholders. For example, this data file

{
    "name": "Yellow",
    "image": "image/sun.png",
    "colorCode": "#cccc00"
}

Creates this image

You can check out the whole thing in the HTML to Image Generator’s GitHub repository.

I hope someone finds it useful, and if you have suggestions for a better name, leave a message in the comments below.

Rubber Duck Debugging

There is a bit of dev folklore about a developer who had the experience of people coming to ask for help with problems they had encountered. What kept happening was  that they would stop midway through explaining the problem and walk away with a solution. All without the dev saying a thing.

After this happened a few times, the dev realized his participation in the process might not be required. To test this theory, he put a rubber duck on his desk.

The rule was, if you wanted to ask a question, you first had to explain the problem to the duck. Amazingly, explaining the problem to the duck had the same success rate as explaining the problem to the dev.

This practice has become known as “Rubber Duck Debugging.”

I’m not saying I’ve ever engaged in rubber duck debugging, but just yesterday I stopped partway through entering a support ticket and implemented the solution without any involvement from the support team….

Home Assistant: Text to Speech and URLs

This is one of those “In case I run into this again” type of posts, with the hope that it might help someone else too.

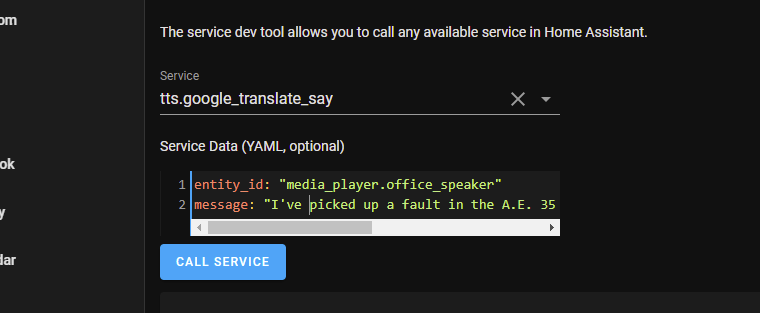
I’ve been trying to get Home Assistant’s text to speech integration working, but when I try to play anything via the developer tools or even a smart speaker’s entity card, all I get is a beep but no speech. I haven’t much use for it until recently, but I know it was working at one time, so something must have changed.

What I finally figured out is that my Home Assistant instance was misconfigured. Under Configuration > General, there are two URL settings. One is “External URL”, which is the URL to use for accessing your Home Assistant instance from outside your house. The other is “Internal URL” which is the URL to use from devices which are on your home network.

A few months ago, I set up Let’s Encrypt with DuckDNS so I could securely use the Home Assistant companion app from outside the house. This had the side effect of making it so the assistant could only be contacted via https. It’s still on port 8123 though, so there’s really no place to redirect from.

What does all of this have to do with Home Assistant? The TLS certificate associated with my setup only works for the name I setup with DuckDNS, so I’ve been using that name and hadn’t noticed that Home Assistant’s “Internal URL” was set to the RaspberryPi’s IP address instead of the DuckDNS name. So when my smart speaker attempted to retrieve the audio file from that URL, the HTTP connection it was using failed.

I updated the internal URL to match the DuckDNS name, and voila! I can now play speech through my smart speakers.

Turning off Web Proxy Auto-Discovery Protocol (WPAD)

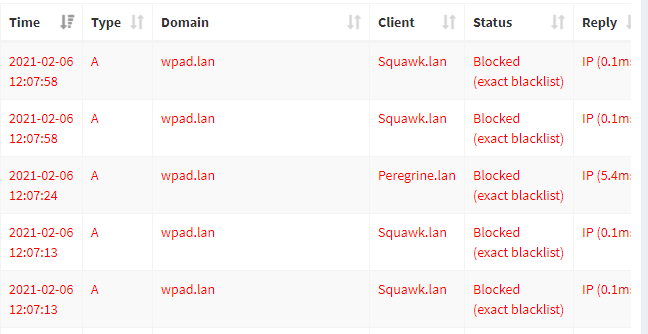
Along with blocking some trackers, running my own DNS with Pi-hole gives me the “super power” of being able to see what DNS queries my computers are doing. This morning, I happened to notice that my desktop PC had made a bunch of lookups for “wpad.lan”.

Pi-hole appends “.lan” to the name of any machine on the local network, but that’s not a name I recognized. So what’s going on here?

Googling for “wpad.lan” lead me to discover that it’s a protocol for automatically discovering and configuring proxy servers. Most operating systems have it off by default, but Windows defaults it to on. More concerning, having proxy auto-discovery turned on is a security concern. Not so much on a home or corporate network (indeed, it’s likely helpful for corporate networks, which is perhaps why it’s on by default), but if you have it on and connect to a public network (e.g. a coffee shop, library, etc.) an attacker may be able to see all the details of your http requests (not breaking https, but working around it).

The desktop PC isn’t super-portable, so I’m not too concerned about unfamiliar WiFi, but apparently this is even a risk if you’re using VPN, so I definitely want to lockdown the laptops.

A bit more digging led me to a How-To Geek article summarizing the problem and including detailed instructions on how to turn off the auto-discovery.

In a nutshell:

  1. Launch the settings app
  2. Go to “Network & Internet”
  3. In the left navigation, choose “Proxy”
  4. Turn off the slider for “Automatically detect settings.”

Troubleshooting puppeteer in WSL2

I’m working on a small project to generate image files from HTML using a web browser. This is something I’ve toyed with for a while, but never really dug into canvas far enough. Once I discovered the puppeteer package for node, the dream seemed suddenly within reach.

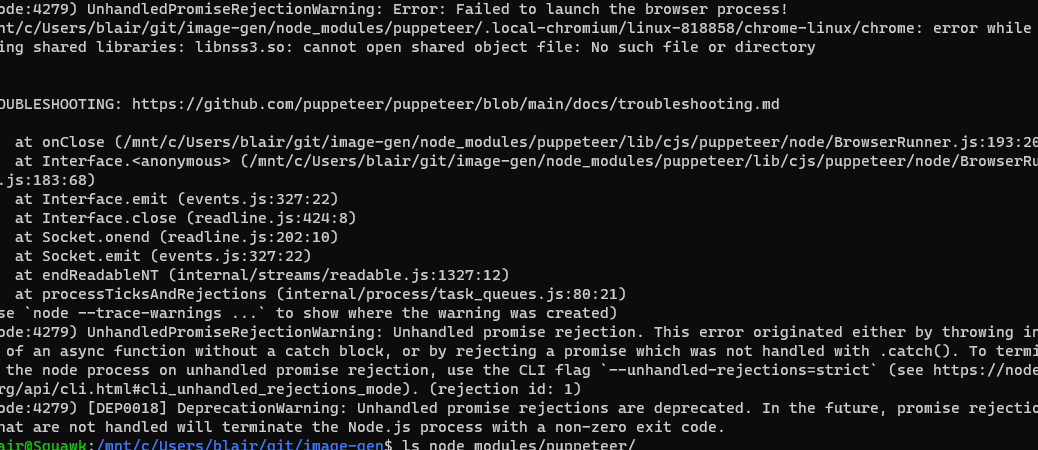
Everything was going along fine, until I got to the point of actually trying to launch the headless browser. Then my program started crashing with the message:

(node:4279) UnhandledPromiseRejectionWarning: Error: Failed to launch the browser process!
/mnt/c/Users/blair/git/image-gen/node_modules/puppeteer/.local-chromium/linux-818858/chrome-linux/chrome: error while loading shared libraries: libnss3.so: cannot open shared object file: No such file or directory

The message included a link to a troubleshooting guide, which did mention some tips for Windows, but that was the Windows GUI environment and I’m using Ubuntu 20.04, running under the Windows Subsystem for Linux (WSL2). That meant it was either fix it myself, fire up a VM, or install node under Windows (which would mean losing the node version manager tool).

One of my main reasons for doing Node development in Linux is the ability to use nvm. A VM is much too heavy a solution for my tastes, so I wanted to see if I could get it working. And off to Google I went.

Searching for the error message is my usual first step, but although it turned up plenty of other people having problems (plus a few open GitHub issues from several years ago), it didn’t offer any solutions. Finally, a search for “puppeter wsl2 libnss3.so” led to a comment on an issue from last June where someone got it running by installing a bunch of packages manually.

0ne of the nice things about WSL is if you break your installation badly, it’s fairly trivial to remove it and reinstall a new copy. So it was fairly low risk to try installing the missing pieces to see if I could get it to work.

The error message even gave me a starting point: “error while loading shared libraries: libnss3.so: cannot open shared object file: No such file or directory.”

There’s a page at https://packages.ubuntu.com/ which allows you to search for which package a library comes from. I started by putting libnss3 in the keyword field and specifying focal (aka “20.04”) as the distribution, and began the iterative process of looking up the installing the missing packages, trying my program again, and then looking up the next failed package. Happily, all it took was a half-dozen tries before my script started working again.

Here’s the list:

libnss3
libatk-adaptor
libcups2
libxkbcommon0
libgtk-3-0
libgbm1

Full-disclosure: midway through, it occurred to me that the reason the packages were missing might be because WSL isn’t a GUI environment and therefore doesn’t have a browser installed. Running sudo apt install -y chromium-browser didn’t solve the problem, but it is possible that this installed some additional packages which I was then able to avoid installing manually.

Now to see if I can get it to render a page. ?

Notes on switching to Mac

A friend recently announced her job was requiring her to use a Mac, but she’d only ever used Windows and could anyone help her get started?

A similar work-related transition caused me to add Mac to my skillset a couple years ago and this request for assistance was the final push I needed to get my notes organized; here they are in a form that will perhaps help others as well.

I’m keyboard-oriented, so a lot of this focuses on using the keyboard and keyboard shortcuts.

Keyboard Navigation

One of the biggest changes from Windows to Mac is that for most things, where Windows uses the control (Ctrl) key, Mac uses the command (Cmd) key. It’s the one that looks like a square with loops on the corners. (If you plug a Windows keyboard into a Mac, you’ll use the “Windows” key as the command key.)

The control key does still get used, but it tends to be more dependent on the individual program.

Here’s a quick list of common keyboard shortcuts. Apple has a longer list in a support document at https://support.apple.com/en-us/HT201236.

FunctionWindowsMac
CopyCtrl-CCmd-C
CutCtrl-XCmd-X
PasteCtrl-VCmd-V
Move to start of lineHomeCmd-left arrow
Move to end of lineEndCmd-right arrow
Move to previous wordCtrl-left arrowOption-left arrow
Move to next wordCtrl-right arrowOption-right arrow
UndoCtrl-ZCmd-Z
Redo (undo the undo)Ctrl-YShift-Cmd-Z

Switching between programs

On Windows, you can “Alt-Tab” to switch between programs. On Mac, you use Command-Tab to switch between programs, but it doesn’t work the way Windows does. If you have multiple copies of Word open, Command-Tab will bring them ALL to the foreground.

To switch between instances of the same program (e.g. Switch between a meeting agenda and a report) use Command-` (That’s the key in the far upper-left of the keyboard, usually between Escape and Tab. It’s also known as the “backtick” or accent key. The “uppercase” version of that key is the tilde.)

Navigating the file system

On Windows, you navigate the file system with Windows Explorer. On Mac, it’s the Finder. This is the blue “smiley face” which appears in the “Dock.” (When I started using Mac, this was at the bottom of the screen, with the Finder icon on the left. Your mileage may vary.)

Launching Programs

There are at least two ways to launch applications

I find the fastest way to launch a program is by holding down the command key and pressing the space bar. This causes a prompt to appear where you can type the name of the program you want to run. As soon as you’ve typed enough for the program name to be selected, hit the Enter key to launch it. (This is the “Spotlight Search.)

Alternatively, in the finder, the area on the left includes an “Applications” tab. If you click on that, you’ll be presented with a list of installed applications.

Once a program has been launched, it will appear in the dock. You can right click on the application and choose to have it remain in the dock, even if it’s not running.

Macworld has a list of five ways to launch an app at:
https://www.macworld.com/article/3108469/5-ways-to-launch-mac-apps-from-the-keyboard.html

Screenshots

Mac keyboards don’t have a print screen button. If you plug in a Windows keyboard, the print screen button won’t do anything.

To take a screenshot in Mac, hold down the Command and Shift keys and then press the 4. You then use the mouse to select the area of the screen you wish to capture. Afterward, a thumbnail image will appear at the bottom right of the screen for 5-10 seconds. Click on the thumbnail to access the full-size image which you can then perform some rudimentary editing on before using Command-C to copy it into another program. (This is similar to the Windows-Shift-S functionality recently added to Windows 10.)

Along with Cmd-Shift-4, Apple’s list of keyboard shortcuts says you can also use Cmd-Shift-3 and (in newer versions of the OS) Cmd-Shift-5. (This latter apparently gives you an ability to record the screen which I wasn’t aware of before writing this.)

Apple offers a support article on screenshots at https://support.apple.com/en-us/HT201361

Program preferences

In Windows, programs are free to use whatever conventions they wish to launch program settings (generally a “Settings” item in the “File” menu, or sometimes “Preferences” under the “Edit” menu).

On Mac, program preferences are always (almost always?) accessible via a “Preferences” item on the menu item with the program’s name. This may also be accessed via the Command-Comma keyboard shortcut.

Accessing the Menu Bar

As mentioned at the beginning, I’m keyboard-oriented. I’ve not found a reliable way to do this. According to an article on c|net titled “Access menus via the keyboard in OSX“, you can use Command-F2.

Unfortunately, on newer Macbooks equipped with a touchbar, the function keys aren’t always available. As an alternative, you can use Command-Shift-/ (aka “Command-?”) to get into the Help search menu item. I find that to be enough of a hassle that using the mouse is easier.

Helpful Bookmarks

RDP connection to Linux

Going down one rabbit hole or another last night, I somewhat randomly found an article detailing how to install and access a graphical desktop UI on the Windows Subsystem for Linux.

The gist of it is

  1. Update your packages.
  2. Install the xfce4 package and optionally, xfce4-goodies (one imagines this would work for other desktops as well)
  3. Install xrdp
  4. Change the port (the default RDP port is used for connecting to the shell)
  5. Start xrdp
  6. Launch an RDP to localhost, using the new port number.

It’s a neat trick, but I’m not sure how much use I have for it. Most of what I do with WSL (e.g. running various Linux utilities) is command-line oriented. A GUI just adds extra steps. Plus, because of the way WSL works, you have to restart xrdp any time you restart Windows. That’s already a nuisance with XAMPP.

But that one step, installing xrdp. I might have a use case for that. I keep a couple Linux VMs around for things where I do want a GUI, and it’s also a nuisance having to launch the Hyper-V manager in order to connect. If I could just leave the VM running in the background and RDP to it as needed…. that would be helpful.

FR, Gridview, and puns

I follow @Cassidoo on Twitter and spotted this thread she started.

I know a few folks who think puns are for children and not groan adults, but me, I’ve always enjoyed a good play on words. She continues on for a few more tweets, all playing off CSS units of measurement, and other people chimed in with their own.

As I said, I like a good play on words, but one thing was bothering me, “What’s this ‘fr’ thing?” One Google search later, I now know it’s a unit of measure meaning, to use an automatically calculated fraction of the space in a container. It’s used in grids and flexboxes and solves some problems where you accidentally use more than 100% of the available space.

You can read about it in the spec, but I found this introduction to the fr CSS unit to be quite helpful.

I do believe, I may have a few dozen uses for this. ?

Home Assistant and TP-Link

Last week, I spotted this tweet from the official Home-Assistant account.

In short, what’s happened is that TP-Link issued a firmware update that turns off the ability to control their smart plugs (and, one assumes, smart switches) from a device on the local network (e.g. Home Assistant), leaving the cloud-based API, and their official KASA app, as the only way to control the devices.

I use TP-Link smart plugs myself. Currently to automate some lamps in the living room, but I’ll also be using them soon to automate the Christmas lights. (Sure, I could use a lamp timer, but I want the lights to go on right at sunset, not “sometime near sunset.” ?) For me, key parts of the value proposition were (a) It worked with Home Assistant (b) It didn’t require using someone else’s cloud (i.e. my usage patterns remain private).

Digging into it a bit… Turns out that there really is a legit security flaw with these devices. I haven’t seen any official details from TP-Link, but I found other reports of problems (Which?, October 2020; Fernando Gont, March 2017) involving weak encryption and the ability for other people to control the device.

So, it’s a legitimate concern. Ideally, the fix would be a locally accessible API with authentication. Turning off local access altogether is rather “ham fisted.”

Home Assistant has issued an alert that the TP-Link integration is “broken” with a link to a user-community discussion, though the alert isn’t really as obvious as one might hope….

Now that I know about the problem, I’ll have to weigh the risks of leaving the firmware out of date against losing my automations. I like the TP-Link plugs, they’ve been pretty reliable over the past several years, and the Home Assistant integration is about as simple as they come (you add a plug to your network, Home Assistant adds it to the list of devices…. easy peasy).

Ultimately, this comes down to the risks of using a “black box” product, where there is no official support for Home Assistant. Fortunately, there is a bit of good news in this. TP-Link seems to value the Home Assistant community and in response to the uproar is working on a fix to restore the local-control functionality.

The question is, do I trust them not to break it again?

Sending mail from a script on a Raspberry Pi

I’m working on a project where I need to send email from my Raspberry Pi. Installing a full-blown SMTP server would be overkill, I just need something where I can send messages from a bash script.

A brief search led me to a forum post from 2013 which talked about configuring the ssmtp package. That post in turn referenced a step-by-step guide from 2009. Unfortunately, both seem to be out of date, and the latter is for installing it on CentOS?RHEL/RedHat/Fedora. So here’s my attempt at an updated version for the Pi (which should apply to any Debian-based Linux distribution).

Notes

  • These instructions send via Gmail. If you’re using two-factor authentication (and you really should), you’ll need to set up an application -specific password. Otherwise, you’ll get authentication errors.
  • The password is stored in plain text. This solution is not suitable for use on a shared system.

The Steps

sudo apt update -y && sudo apt upgrade -y
sudo apt install -y ssmtp
sudo vi /etc/ssmtp/ssmtp.conf

Make these changes to the ssmtp.conf file

mailhub=smtp.gmail.com:463
FromLineOverride=YES
AuthUser=Your_GMail_Address
AuthPass=Your_GMail_Password
UseTLS=YES

I also set the root= setting to my email address. I don’t believe this is necessary, but it does allow me to get notified when something goes wrong with one of my messages. (The way I first found out my configuration was working was a message from a cron job which had some unexpected output.)

Testing

Part of the installation is to set up a symlink so that sendmail becomes an alias for ssmtp. You can use either command.

The ssmtp command doesn’t seem to include command-line options for specifying the subject line or the name of the recipient..

So, here’s a command line you can use. Edit the email address as suits your needs. (The sender name and email address will be embedded by GMail.)

Ignore the word-wrap, this is all one line.

echo -e "Subject: Test Message\nTo: Your Name Here <you@example.com>\nThis message was sent via ssmtp." | ssmtp -t

Alternatively, you can put the recipient’s email address on the command line (the message will then be received as a BCC).

echo -e "Subject: Test Message\nThis message was sent via ssmtp." | ssmtp you@example.com

Troubleshooting

Four files are written to /var/logs

  • mail.err – contains an entry for each time there’s a problem sending a message.
  • mail.info – contains an entry for each attempt (successful or failed) at sending a message
  • mail.log – duplicates mail.info.
  • mail.warn – duplicates mail.err.

(Image via Pixabay user Deans_icons used under Pixabay License.)